Thursday, September 5, 2019

Multi-Nodes Redis Cluster With Docker

Read this article on my new blog

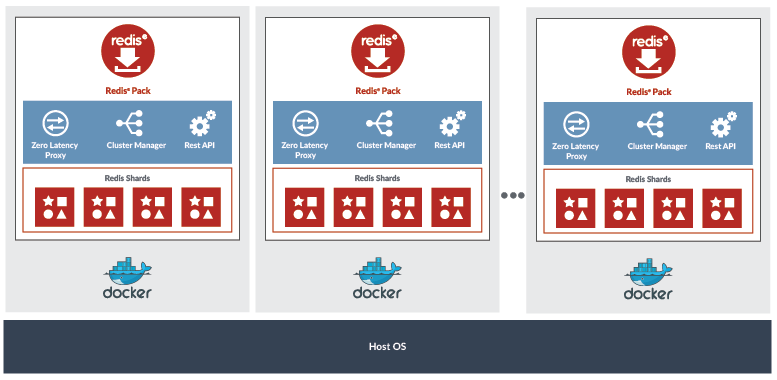
As part of my on-boarding/training at RedisLabs I continue to play with the product, and I have decided today to install a local 3 nodes cluster of Redis Enterprise Server (RS); and show how easy is to move from a single node/shard database to a multi nodes highly available one.
Once your cluster is up & running, you will kill some containers to see how the system automatically fail-over to guarantee service continuity.
The deployment will look more or less like the schema below, (coming from RedisLabs documentation)

Go to the complete article here.

Tuesday, September 3, 2019

Getting Started With Redis Streams & Java

Read this article on my new blog

As you may have seen, I have joined Redis Labs a month ago; one of the first task as a new hire is to learn more about Redis. So I learned, and I am still learning.
This is when I discovered Redis Streams. I am a big fan of streaming-based applications so it is natural that I start with a small blog post explaining how to use Redis Streams and Java.

Tuesday, August 8, 2017

Getting started with MapR-DB Table Replication


Introduction

MapR-DB Table Replication allows data to be replicated to another table that could be on on the same cluster or in another cluster. This is different from the automatic and intra-cluster replication that copies the data into different physical nodes for high availability and prevent data loss.

This tutorial focuses on the MapR-DB Table Replication that replicates data between tables on different clusters.

Replicating data between different clusters allows you to:

  • provide another level of disaster recovery that protects your data and applications against global data center failure,
  • push data close to the applications and users,
  • aggregate the data from mutliple datacenters.

Replication Topologies

MapR-DB Table Replication provides various topologies to adapt the replication to the business and technical requirements:

  • Master-slave replication : in this topology, you replicate one way from source tables to replicas. The replicas can be in a remote cluster or in the cluster where the source tables are located.
  • Multi-Master replication : in this replication topology, there are two master-slave relationships, with each table playing both the role of a master and a slave. Client applications update both tables and each table replicates updates to the other.

In this example you will learn how to setup multi-master replication.

Friday, January 20, 2017

Getting Started With Kafka REST Proxy for MapR Streams


Introduction

MapR Ecosystem Package 2.0 (MEP) is coming with some new features related to MapR Streams:

MapR Ecosystem Packs (MEPs) are a way to deliver ecosystem upgrades decoupled from core upgrades - allowing you to upgrade your tooling independently of your Converged Data Platform. You can lean more about MEP 2.0 in this article.

In this blog we describe how to use the REST Proxy to publish and consume messages to/from MapR Streams. The REST Proxy is a great addition to the MapR Converged Data Platform allowing any programming language to use MapR Streams.

The Kafka REST Proxy provided with the MapR Streams tools, can be used with MapR Streams (default), but also used in a hybrid mode with Apache Kafka. In this article we will focus on MapR Streams. <!-- more -->

Prerequisites

  • MapR Converged Data Platform 5.2 with MEP 2.0
    • with MapR Streams Tools
  • curl, wget or any HTTP/REST Client tool

Create the MapR Streams and Topic

A stream is a collection of topics that you can manage as a group by:

  1. Setting security policies that apply to all topics in that stream
  2. Setting a default number of partitions for each new topic that is created in the stream
  3. Set a time-to-live for messages in every topic in the stream

You can find more information about MapR Streams concepts in the documentation.

On your Mapr Cluster or Sandbox, run the following commands:

$ maprcli stream create -path /apps/iot-stream -produceperm p -consumeperm p -topicperm p

$ maprcli stream topic create -path /apps/iot-stream -topic sensor-json -partitions 3

$ maprcli stream topic create -path /apps/iot-stream -topic sensor-binary -partitions 3

Start Kafka Console Producers and Consumers

Open two terminal windows and run the consumer Kafka utilities using the following commands:

Consumer

  • Topic sensor-json
$ /opt/mapr/kafka/kafka-0.9.0/bin/kafka-console-consumer.sh --new-consumer --bootstrap-server this.will.be.ignored:9092 --topic /apps/iot-stream:sensor-json
  • Topic sensor-binary
$ /opt/mapr/kafka/kafka-0.9.0/bin/kafka-console-consumer.sh --new-consumer --bootstrap-server this.will.be.ignored:9092 --topic /apps/iot-stream:sensor-binary

This two terminal windows will allow you to see the messages posted on the different topics

Using Kafka REST Proxy

Inspect Topic Metadata

The endpoint /topics/[topic_name] allows you to get some informations about the topic. In MapR Streams, topics are part of a stream identified by a path; to use the topic using the REST API you have to use the full path, and encode it in the URL; for example:

  • /apps/iot-stream:sensor-json will be encoded with %2Fapps%2Fiot-stream%3Asensor-json

Run the following command, to get information about the sensor-json topic

$ curl -X GET  http://localhost:8082/topics/%2Fapps%2Fiot-stream%3Asensor-json

Note: For simplicity reason I am running the command from the node where the Kafka REST proxy is running, so it is possible to use localhost.

You can print JSON in a pretty way, by adding a Python command such as :

$ curl -X GET  http://localhost:8082/topics/%2Fapps%2Fiot-stream%3Asensor-json | python -m json.tool

Default Stream

As mentioned above, the Stream path is part of the topic name you have to use in the command; however it is possible to configure the MapR Kafka REST Proxy to use a default stream. For this you should add the following property in the /opt/mapr/kafka-rest/kafka-rest-2.0.1/config/kafka-rest.properties file:

  • streams.default.stream=/apps/iot-stream

    When you change the Kafka REST proxy configuration, you must restart the service using maprcli or MCS.

    The main reason to use the streams.default.stream properties is to simplify the URLs used by the application for example

    • with streams.default.stream you can use curl -X GET http://localhost:8082/topics/
    • without this configuration, or if you want to use a specific stream you must specify it in the URL http://localhost:8082/topics/%2Fapps%2Fiot-stream%3Asensor-json

    In this article, all the URLs contains the encoded stream name, like that you can start using the Kafka REST proxy without changind the configuration and also use it with different streams.

Publishing Messages

The Kafka REST Proxy for MapR Streams allows application to publish messages to MapR Streams. Messages could be send as JSON or Binary content (base64 encoding).

To send a JSON Message:

  • the query should be a HTTP POST
  • the Content-Type should be : application/vnd.kafka.json.v1+json
  • the Body:
{
  "records":
  [
    {
      "value":
      {
        "temp" : 10 ,
        "speed" : 40 ,
        "direction" : "NW"
        }  
      }
  ]
}

The complete request is:

curl -X POST -H "Content-Type: application/vnd.kafka.json.v1+json" \
  --data '{"records":[{"value": {"temp" : 10 , "speed" : 40 , "direction" : "NW"}  }]}' \
  http://localhost:8082/topics/%2Fapps%2Fiot-stream%3Asensor-json

You should see the message printed in the terminal window where the /apps/iot-stream:sensor-json consumer is running.

To send a binary Message:

  • the query should be a HTTP POST
  • the Content-Type should be : application/vnd.kafka.binary.v1+json
  • the Body:
{
  "records":
  [
    {
      "value":"SGVsbG8gV29ybGQ="
    }
  ]
}

Note that SGVsbG8gV29ybGQ= is the string "Hello World" encoded in Base64.

The complete request is:

curl -X POST -H "Content-Type: application/vnd.kafka.binary.v1+json" \
  --data '{"records":[{"value":"SGVsbG8gV29ybGQ="}]}' \
  http://localhost:8082/topics/%2Fapps%2Fiot-stream%3Asensor-binary

You should see the message printed in the terminal window where the /apps/iot-stream:sensor-binary consumer is running.

Sending multiple messages

The records field of the HTTP Body allows you to send multiple messages for example you can send:

curl -X POST -H "Content-Type: application/vnd.kafka.json.v1+json" \
  --data '{"records":[{"value": {"temp" : 12 , "speed" : 42 , "direction" : "NW"}  }, {"value": {"temp" : 10 , "speed" : 37 , "direction" : "N"}  } ]}' \
  http://localhost:8082/topics/%2Fapps%2Fiot-stream%3Asensor-json

This command will send 2 messages, and increment the offset by 2. You can do the same with binary content, just add new element in the JSON array; for example:

curl -X POST -H "Content-Type: application/vnd.kafka.binary.v1+json" \
  --data '{"records":[{"value":"SGVsbG8gV29ybGQ="}, {"value":"Qm9uam91cg=="}]}' \
  http://localhost:8082/topics/%2Fapps%2Fiot-stream%3Asensor-binary

As you probably know, it is possible to set a key to a message to be sure that all the messages with the same key will arrive in the same partition. For this, add the key attribute to the message as follow:

{
  "records":
  [
    {
      "key": "K001",
      "value":
      {
        "temp" : 10 ,
        "speed" : 40 ,
        "direction" : "NW"
        }  
      }
  ]
}

Now that you know how to post messages to MapR Stream topics usinf the REST Proxy, let's see how to consume the messages.

Consuming Messages

The REST proxy can also be used to consume messages from topics; for this you need to:

  1. Create a consumer instance.
  2. Use this URL returned by the first call to read message.
  3. Delete the consumer instanced if needed.

Creating the consumer instance

The following request creates the consumer instance:

curl -X POST -H "Content-Type: application/vnd.kafka.v1+json" \
      --data '{"name": "iot_json_consumer", "format": "json", "auto.offset.reset": "earliest"}' \
      http://localhost:8082/consumers/%2Fapps%2Fiot-stream%3Asensor-json

The response from the server looks like:

{
  "instance_id":"iot_json_consumer",
  "base_uri":"http://localhost:8082/consumers/%2Fapps%2Fiot-stream%3Asensor-json/instances/iot_json_consumer"
}

Note that we have used the /consumers/[topic_name] to create the consumer.

The base_uri will be used by the subsequent requests to get the messages from the topic. Like any MapR Streams/Kafka consumer the auto.offset.reset defines its behavior. In this example the value is set to earliest, this means that the consumer will read the messages from the beginning. You can find more information about the consumer configuration in the MapR Streams documentation.

Consuming the messages

To consume the messages, just add the Mapr Streams topic to the URL of the consumer isntance.

The following request consumes the messages from the topic:

curl -X GET -H "Accept: application/vnd.kafka.json.v1+json" \
http://localhost:8082/consumers/%2Fapps%2Fiot-stream%3Asensor-json/instances/iot_json_consumer/topics/%2Fapps%2Fiot-stream%3Asensor-json

This call returns the messages in a JSON document:

[
  {"key":null,"value":{"temp":10,"speed":40,"direction":"NW"},"topic":"/apps/iot-stream:sensor-json","partition":1,"offset":1},
  {"key":null,"value":{"temp":12,"speed":42,"direction":"NW"},"topic":"/apps/iot-stream:sensor-json","partition":1,"offset":2},
  {"key":null,"value":{"temp":10,"speed":37,"direction":"N"},"topic":"/apps/iot-stream:sensor-json","partition":1,"offset":3}
]

Each call to the API returns the new messages published, based on the offset of the last call.

Note that the Consumer will be destroyed:

  • after some idle time set by the consumer.instance.timeout.ms (default value set to 300000ms / 5 minutes)
  • where it is destroyed using a REST API call (see below).

Consuming binary format messages

The approach is the same if you need to consume binary messages, you need to change the format and accept header.

Call this URL to create a consumer instance for the binary topic:

curl -X POST -H "Content-Type: application/vnd.kafka.v1+json" \
      --data '{"name": "iot_binary_consumer", "format": "binary", "auto.offset.reset": "earliest"}' \
      http://localhost:8082/consumers/%2Fapps%2Fiot-stream%3Asensor-binary

Then consume messages, the accept header is set to application/vnd.kafka.binary.v1+json:

curl -X GET -H "Accept: application/vnd.kafka.binary.v1+json" \
http://localhost:8082/consumers/%2Fapps%2Fiot-stream%3Asensor-binary/instances/iot_binary_consumer/topics/%2Fapps%2Fiot-stream%3Asensor-binary

This call returns the messages in a JSON document, and the value is encoded in Base64

[
  {"key":null,"value":"SGVsbG8gV29ybGQ=","topic":"/apps/iot-stream:sensor-binary","partition":1,"offset":1},
  {"key":null,"value":"Qm9uam91cg==","topic":"/apps/iot-stream:sensor-binary","partition":1,"offset":2}
]

Delete consumer instances

As mentioned before the consumer will be destroyed automatically based on the consumer.instance.timeout.ms configuration of the REST Proxy; it is also possible to destroyed the instance using the consumer instance URI and an HTTP DELETE call, as follow:

curl -X DELETE http://localhost:8082/consumers/%2Fapps%2Fiot-stream%3Asensor-binary/instances/iot_binary_consumer

Conclusion

In this article you have learned how to use the Kafka REST Proxy for MapR Streams that allow any application to use messages published in the MapR Converged Data Platform.

You can find more information about the Kafka REST Proxy in the MapR documentation and the following resources:
Wednesday, January 4, 2017

Getting Started with MQTT and Java


MQTT (MQ Telemetry Transport) is a lightweight publish/subscribe messaging protocol. MQTT is used a lot in the Internet of Things applications, since it has been designed to run on remote locations with system with small footprint.

The MQTT 3.1 is an OASIS standard, and you can find all the information at http://mqtt.org/

This article will guide you into the various steps to run your first MQTT application:

  1. Install and Start a MQTT Broker
  2. Write an application that publishes messages
  3. Write an application that consumes messages

The source code of the sample application is available on GitHub.

Tuesday, October 11, 2016

Getting started with Apache Flink and Kafka

Introduction

Apache Flink is an open source platform for distributed stream and batch data processing. Flink is a streaming data flow engine with several APIs to create data streams oriented application.

It is very common for Flink applications to use Apache Kafka for data input and output. This article will guide you into the steps to use Apache Flink with Kafka.

Monday, September 26, 2016

Streaming Analytics in a Digitally Industrialized World

Get an introduction to streaming analytics, which allows you real-time insight from captured events and big data. There are applications across industries, from finance to wine making, though there are two primary challenges to be addressed.

Did you know that a plane flying from Texas to London can generate 30 million data points per flight? As Jim Daily of GE Aviation notes, that equals 10 billion data points in one year. And we’re talking about one plane alone. So you can understand why another top GE executive recently told Ericsson Business Review that "Cloud is the future of IT," with a focus on supporting challenging applications in industries such as aviation and energy.

Thursday, September 1, 2016

Setting up Spark Dynamic Allocation on MapR

Apache Spark can use various cluster manager to execute application (Stand Alone, YARN, Apache Mesos). When you install Apache Spark on MapR you can submit application in a Stand Alone mode or using YARN.

This article focuses on YARN and Dynamic Allocation, a feature that lets Spark add or remove executors dynamically based on the workload. You can find more information about this feature in this presentation from Databricks:

Let’s see how to configure Spark and YARN to use dynamic allocation (that is disabled by default).

Thursday, March 31, 2016

Save MapR Streams messages into MapR DB JSON

In this article you will learn how to create a MapR Streams Consumer that saves all the messages into a MapR-DB JSON Table.

Thursday, March 10, 2016

Getting Started with MapR Streams

You can find a new tutorial that explains how to deploy an Apache Kafka application to MapR Streams, the tutorial is available here:

MapR Streams is a new distributed messaging system for streaming event data at scale, and it’s integrated into the MapR converged platform. MapR Streams uses the Apache Kafka API, so if you’re already familiar with Kafka, you’ll find it particularly easy to get started with MapR Streams.

Wednesday, February 10, 2016

Getting Started With Sample Programs for Apache Kafka 0.9

Ted Dunning and I have worked on a tutorial that explains how to write your first Kafka application. In this tutorial you will learn how to:

  • Install and start Kafka
  • Create and Run a producer and a consumer

You can find the tutorial on the MapR blog:

Thursday, December 10, 2015

Using Apache Drill REST API to Build ASCII Dashboard With Node

Apache Drill has a hidden gem: an easy to use REST interface. This API can be used to Query, Profile and Configure Drill engine.

In this blog post I will explain how to use Drill REST API to create ascii dashboards using Blessed Contrib.

The ASCII Dashboard looks like

Tuesday, August 18, 2015

Convert CSV file to Apache Parquet... with Drill

A very common use case when working with Hadoop is to store and query simple files (CSV, TSV, ...); then to get better performance and efficient storage convert these files into more efficient format, for example Apache Parquet.

Apache Parquet is a columnar storage format available to any project in the Hadoop ecosystem. Apache Parquet has the following characteristics:
  • Self-describing
  • Columnar format
  • Language-independent
Let's take a concrete example, you can find many interesting Open Data sources that distribute data as CSV files- or equivalent format-. So you can store them into your distributed file system and use them in your applications/jobs/analytics queries. This is not the most efficient way especially when we know that these data won't move that often. So instead of simply storing the CSV let's copy this information into Parquet.

How to convert CSV files into Parquet files?

You can use code to achieve this, as you can see in the ConvertUtils sample/test class. You can use a simpler way with Apache Drill. Drill allows you save the result of a query as Parquet files.
The following steps will show you how to do convert a simple CSV into a Parquet file using Drill.

Tuesday, July 21, 2015

Apache Drill : How to Create a New Function?


Apache Drill allows users to explore any type of data using ANSI SQL. This is great, but Drill goes even further than that and allows you to create custom functions to extend the query engine. These custom functions have all the performance of any of the Drill primitive operations, but allowing that performance makes writing these functions a little trickier than you might expect.

In this article, I’ll explain step by step how to create and deploy a new function using a very basic example. Note that you can find lot of information about Drill Custom Functions in the documentation.

Let’s create a new function that allows you to mask some characters in a string, and let’s make it very simple. The new function will allow user to hide x number of characters from the start and replace then by any characters of their choice. This will look like:

1
MASK( 'PASSWORD' , '#' , 4 ) => ####WORD

You can find the full project in the following Github Repository.
As mentioned before, we could imagine many advanced features to this, but my goal is to focus on the steps to write a custom function, not so much on what the function does.


Wednesday, February 4, 2015

Introduction to MongoDB Security


Last week at the Paris MUG, I had a quick chat about security and MongoDB, and I have decided to create this post that explains how to configure out of the box security available in MongoDB.

You can find all information about MongoDB Security in following documentation chapter:


In this post, I won't go into the detail about how to deploy your database in a secured environment (DMZ/Network/IP/Location/...)

I will focus on Authentication and Authorization, and provide you the steps to secure the access to your database and data.

I have to mention that by default, when you install and start MongoDB, security is not enabled. Just to make it easier to work with.

The first part of the security is the Authentication, you have multiple choices documented here. Let's focus on "MONGODB-CR" mechanism.

The second part is Authorization to select what a user can do or not once he is connected to the database. The documentation about authorization is available here.

Let's now document how-to:
  1. Create an Administrator User
  2. Create Application Users
For each type of users I will show how to grant specific permissions.

Sunday, February 1, 2015

Moving My Beers From Couchbase to MongoDB

See it on my new blog : here

Few days ago I have posted a joke on Twitter

So I decided to move it from a simple picture to a real project. Let’s look at the two phases of this so called project:
  • Moving the data from Couchbase to MongoDB
  • Updating the application code to use MongoDB
Look at this screencast to see it in action:


Friday, January 23, 2015

Everybody Says “Hackathon”!

TLTR:

  • MongoDB & Sage organized an internal Hackathon
  • We use the new X3 Platform based on MongoDB, Node.js and HTML to add cool features to the ERP
  • This shows that “any” enterprise can (should) do it to:
    • look differently at software development
    • build strong team spirit
    • have fun!

Introduction

I have like many of you participated to multiple Hackathons where developers, designer and entrepreneurs are working together to build applications in few hours/days. As you probably know more and more companies are running such events internally, it is the case for example at Facebook, Google, but also ING (bank), AXA (Insurance), and many more.

Last week, I have participated to the first Sage Hackathon!

In case you do not know Sage is a 30+ years old ERP vendor. I have to say that I could not imagine that coming from such company… Let me tell me more about it.


Tuesday, January 20, 2015

Nantes MUG : Event #2

Last night the Nantes MUG (MongoDB Users Group) had its second event. More than 45 people signed up and joined us at the Epitech school (thanks for this!).  We were lucky to have 2 talks from local community members:

How “MyScript Cloud” uses MongoDB

First of all, if you do not know MyScript I invite you to play with the online demonstration. I am pretty sure that you are already using this technology without noticing it, since it is embedded in many devices/applications including: your car look at the Audi Touchpad!

That said Mathieu was not here to talk about the cool features and applications of MyScript but to explain how MongoDB is used to run their cloud product. 

Mathieu explained how you can use MyScript SDK online. You just need to call a REST API to add Handwriting Recognition to your application. Let's make the long story short, and see how MongoDB was chosen and how it is used today:
  • The prototype was done with a single RDBMS instance
  • With the success of the project MyScript Cloud the team had to move to a more flexible solution:
    • Flexible schema to support heterogeneous structures,
    • Highly available solution with automatic failover,
    • Multi datacenter supports with localized read,
  • This is when Mathieu looked at different solution and selected MongoDB and deployed it on AWS.
Mathieu highlighted the following points:
  • Deploy and Manage a Replica Set is really easy, and it is done on multiple AWS data centers,
  • Use the proper read preference  (nearest in this case) to deliver the data as fast as possible,
  • Develop with JSON Documents provides lot of flexibility to the developers, that can add new features faster.


Aggregation Framework

Sebastien "Seb" is software engineering at SERLI and working with MongoDB for more than 2 years now. Seb introduced the reasons why aggregations are needed in applications and the various ways of doing it with MongoDB: simple queries, map reduce, and aggregation pipeline; with a focus on a Aggregation Pipeline.

Using cool demonstrations, Seb explained in a step by step approach the key features and capabilities of MongoDB Aggregation Pipeline:
  • $match, $group, ...
  • $unwind arrays
  • $sort and $limit
  • $geonear
To close his presentation, Seb talked about aggregation best practices, and behavior in a sharded cluster.


And...

As usual the event ended with some drinks and a late dinner!

This event was really great and I am very happy to see what people are doing with MongoDB, including storing ink like MyScript, thanks again to the speakers!

This brings me to the last point : MUGs are driven by the community. You are using MongoDB and want to talk about what you, do not hesitate to reach out the organizers they will be more than happy to have you.

You can find a MUG near you, look here.


Monday, January 12, 2015

How to create a pub/sub application with MongoDB ? Introduction

In this article we will see how to create a pub/sub application (messaging, chat, notification), and this fully based on MongoDB (without any message broker like RabbitMQ, JMS, ... ).

So, what needs to be done to achieve such thing:

  • an application "publish" a message. In our case, we simply save a document into MongoDB
  • another application, or thread, subscribe to these events and will received message automatically. In our case this means that the application should automatically receive newly created document out of MongoDB
All this is possible with some very cool MongoDB features : capped collections and tailable cursors

Capped Collections and Tailable Cursors

As you can see in the documentation, Capped Collections are fixed sized collections, that work in a way similar to circular buffers: once a collection fills its allocated space, it makes room for new documents by overwriting the oldest documents.

MongoDB Capped Collections can be queried using Tailable Cursors, that are similar to the unix tail -f command.  Your application continue to retrieve documents as they are inserted into the collection. I also like to call this a "continuous query".

Now that we have seen the basics, let's implement it.

Building a very basic application 

Create the collection

The first thing to do is to create a new capped collection :


For simplicity, I am using the MongoDB Shell to create the messages collection in the chat database.

You can see on line #7 how to create a capped collection, with 2 options:
  • capped : true : this one is obvious
  • size : 10000 :  this is a mandatory option when you create a capped collection. This is the maximum size in bytes. (will be raised to a multiple of 256)
Finally, on line #9, I insert a dummy document, this is also mandatory to be able to get the tailable cursor to work. 

Write an application

Now that we have the collection, let's write some code.  First in node.js:


From lines #1 to 5 I just connect to my local MongoDB instance.

Then on line #7, I get the messages collection.

And on line #10, I execute a find, using a tailable cursor, using specific options:

  • {} : no filter, so all documents will be returned
  • tailable : true : this one is clear, to say that we want to create a tailable cursor
  • awaitdata : true : to say that we wait for data before returning no data to the client
  • numberOfRetries : -1 :  The number of times to retry on time out, -1 is infinite, so the application will keep trying
Line #11 just force the sort to the natural order,.

Then on line #12, the cursor returns the data, and the document is printed in the console each time it is inserted.

Test the Application

Start the application

node app.js

Insert documents in the messages collection, from the shell or any other tool. 

You can find below a screencast showing this very basic application working:


The source code of this sample application in this Github repository, take the step-01 branch; clone this branch using:

git clone -b step-01 https://github.com/tgrall/mongodb-realtime-pubsub.git


I have also created a gist showing the same behavior in Java:


Mathieu Ancelin has written it in Scala:

Add some user interface

We have the basics of a publish subscribe based application:
  • publish by inserting document into MongoDB
  • subscribe by reading document using a tailable cursor
Let's now push the messages to a user using for example socket.io. For this we need to:
  • add socket.io dependency to our node project
  • add HTML page to show messages
The following gists shows the updated version of the app.js and index.html, let's take a look:

The node application has been updated with the following features:

  • lines #4-7: import of http, file system and socket.io
  • lines #10-21: configure and start the http server. You can see that I have created a simple handler to serve static html file
  • lines #28-39: I have added support to Web socket using socket.io where I open the tailable cursor, and push/emit the messages on the socket.
As you can see, the code that I have added is simple. I do not use any advanced framework, nor manage exceptions, this for simplicity and readability.

Let's now look at the client (html page).

Same as the server, it is really simple and does not use any advanced libraries except socket.io client (line #18) and JQuery (line #19), and used:

  • on line #22 to received messages ans print them in the page using JQuery on line #23
I have created a screencast of this version of the application:


You can find the source code in this Github repository, take the step-02 branch; clone this branch using:

git clone -b step-02 https://github.com/tgrall/mongodb-realtime-pubsub.git


Conclusion

In this first post, we have:

  • learned about tailable cursor and capped collection
  • see how it can be used to develop a pub/sub application
  • expose this into a basic web socket based application
In the next article we will continue to develop a bigger application using these features.


Tuesday, November 25, 2014

Big Data... Is Hadoop the good way to start?

In the past 2 years, I have met many developers, architects that are working on “big data” projects. This sounds amazing, but quite often the truth is not that amazing.

TL;TR

You believe that you have a big data project?
  • Do not start with the installation of an Hadoop Cluster -- the "how"
  • Start to talk to business people to understand their problem -- the "why"
  • Understand the data you must process
  • Look at the volume -- very often it is not "that" big
  • Then implement it, and take a simple approach, for example start with MongoDB + Apache Spark

The infamous "big data project"

A typical discussion would look like:

Me: “Can you tell me more about this project, what do you do with your data?”

Mr. Big Bytes: “Sure, we have a 40 nodes Hadoop cluster..."

Me: “This is cool but which type of data do you store, and what is the use case, business value?"

Mr. Big Bytes: “We store, all the logs of our applications, we have hundreds of gigabits…"
After a long blank:“We have not yet started to analyze these data. For now it is jut  'us, the IT team,' we store the data, like that soon we will be able to do interesting things with them"

You can meet the same person few months later; the cluster is still sitting here, with no activity on it. I even met some consultants telling me they received calls from their customer asking the following:
“Hmmm, we have an Hadoop cluster installed, can you help us to find what to do with it?"

Wrong! That is wrong!!!!! This means that the IT Team has spent lot of time for nothing, at least for the business; and I am not even sure the team has learned something technically.

Start with the "Why" not with the "How"!

The solution to this, could be obvious, start your “big data project” answering the “why/what” questions first! The “how”, the implementation, will come later.

I am sure that most of the enterprises will benefit of a so called “big data project”, but it is really important to understand the problems first. And these problems are not technical… at least at the beginning. So you must spend time with the business persons to understand what could help them. Let's take some examples.

You are working in a bank or insurance, business people will be more than happy to predict when/why customer will be leaving the company by doing some churn analysis; or it will be nice to be able to see when it makes lot of sense to sell new contracts, service to existing customers. 

You are working in retail/commerce, your business will be happy to see if they can adjust the price to the market, or provide precise recommendations to a user from an analysis of other customer behavior.

We can find many other examples. But as you can see we are not talking about technology, just business and possible benefits. In fact nothing new, compare with the applications you are building, you need first to have some requirements/ideas to build a product. Here we just need to have some "data input" to see how we can enrich the data with some business value.

Once you have started to ask all these questions you will start to see some input, and possible processing around them:
  • You are an insurance, you customers has no contact with your representative, or the customer satisfaction is medium/bad; you start to see some customer name in quotes coming from price comparison website…. hmm you can guess that they are looking for a new insurance. 
  • Still in the insurance, when your customer are close to the requirement age, or has teenagers learning how to drive, moving to college, you know that you have some opportunity to sell new contract, or adapt existing ones to the new needs
  • In retail, you may want to look to all customers and what they have ordered, and based on this be able to recommend some products to a customer that "looks" the same.
  • Another very common use case these days, you want to do some sentiment analysis of social networks to see how your brand is perceived by your community
As you can see now, we can start to think about the data we have to use and the type of processing we have to do on them.

Let's now talk about the "How"

Now that you have a better idea about what you want to do, it does not mean that you should dive into a large cluster installation.

Before that, you should continue to analyze the data:
  • What is the structure of the data that I have to analyze?
  • How big is my dataset?
  • How much data I have to ingest on a period of time (minute, hour, day, ...)
All these questions will help you to understand better your application. This is where it is often interesting too, and we realize that for most of us the "big data" is not that big!

I was working the other day with a Telco company in Belgium, and I was talking about possible new project. I simply said:
  • Belgium is what, 11+ millions of people
  • If you store a 50kb object for each person this represent:
  • Your full dataset will be 524Gb, yes not even a Terabyte!
Do you need a large Hadoop cluster to store and process this? You can use it, but you do not need to! You can find something smaller, and easier to start with.

Any database will do the job, starting with MongoDB. I think it is really interesting to start this project with a MongoDB cluster, not only because it will allow you to scale out as much as you need, but also because you will leverage the flexibility of the document model. This will allow you to store any type of data, and easily adapt the structure to the new data, or requirements.

Storing the data is only one part of the equation. The other part is how you achieve the data processing. Lately I am playing a lot with Apache Spark. Spark provides a very powerful engine for large scale data processing, and it is a lot simpler than Map Reduce jobs. In addition to this, you can run Spark without Hadoop! This means you can connect you Spark to your MongoDB, with the MongoDB Hadoop Connector and other data sources and directly execute job on your main database.

What I like also about this approach, you can when you dataset starts to grow, and it become harder to process all the data on your operational database, you can easily add Hadoop; and keep most of your data processing layer intact, and only change the data sources information. In this case you will connect MongoDB and Hadoop to get/push the data into HDFS, once again using the MongoDB Hadoop Connector.

Conclusion

Too many times, projects are driven by technology instead of focusing on the business value. This is particularly true around big data projects. So be sure you start by understanding the business problem, and find the data that could help to solve it.

Once you have the business problem and the data, select the good technology, that could be very simple, simple files and python scripts, or more often a database like MongoDB with a data processing layer like Spark. And start to move to Hadoop when it is really mandatory... a very, very, very, large dataset.