Showing posts with label nosql. Show all posts

Thursday, September 5, 2019

Multi-Nodes Redis Cluster With Docker

Read this article on my new blog

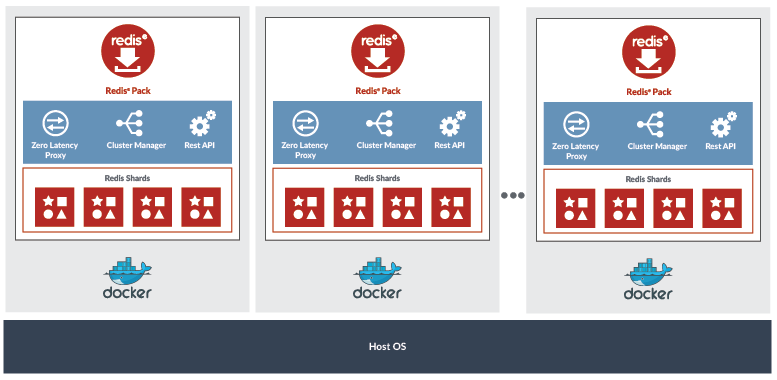
As part of my on-boarding/training at RedisLabs I continue to play with the product, and I have decided today to install a local 3 nodes cluster of Redis Enterprise Server (RS); and show how easy is to move from a single node/shard database to a multi nodes highly available one.
Once your cluster is up & running, you will kill some containers to see how the system automatically fail-over to guarantee service continuity.
The deployment will look more or less like the schema below, (coming from RedisLabs documentation)

Go to the complete article here.

Wednesday, February 4, 2015

Introduction to MongoDB Security


Last week at the Paris MUG, I had a quick chat about security and MongoDB, and I have decided to create this post that explains how to configure out of the box security available in MongoDB.

You can find all information about MongoDB Security in following documentation chapter:


In this post, I won't go into the detail about how to deploy your database in a secured environment (DMZ/Network/IP/Location/...)

I will focus on Authentication and Authorization, and provide you the steps to secure the access to your database and data.

I have to mention that by default, when you install and start MongoDB, security is not enabled. Just to make it easier to work with.

The first part of the security is the Authentication, you have multiple choices documented here. Let's focus on "MONGODB-CR" mechanism.

The second part is Authorization to select what a user can do or not once he is connected to the database. The documentation about authorization is available here.

Let's now document how-to:
  1. Create an Administrator User
  2. Create Application Users
For each type of users I will show how to grant specific permissions.

Sunday, February 1, 2015

Moving My Beers From Couchbase to MongoDB

See it on my new blog : here

Few days ago I have posted a joke on Twitter

So I decided to move it from a simple picture to a real project. Let’s look at the two phases of this so called project:
  • Moving the data from Couchbase to MongoDB
  • Updating the application code to use MongoDB
Look at this screencast to see it in action:


Thursday, July 18, 2013

How to implement Document Versioning with Couchbase

Introduction

Developers are often asking me how to "version" documents with Couchbase 2.0. The short answer is: the clients and server do not expose such feature, but it is quite easy to implement.

In this article I will use a basic approach, and you will be able to extend it depending of your business requirements. 

Design

The first thing to do is to select how to "store/organize" the versions of your document, and for this you have different designs:
  • copy the versions the document into new documents
  • copy the versions of the document into a list of embedded documents
  • store the list of attributes that have been changed into a embedded element (or new documents)
  • store the "delta"
You will have to chose the design based on your application requirements (business logic, size of the dataset, ...).  For this article, let's use one of the most simplistic approach: create new document for each version with the following rules for the keys:
  1. The current version is is a simple Key/Document, no change to the key.
  2. The version is a copy of the document, and the version number is added to the key.
This looks like:
Current Version  mykey
Version 1  mykey::v1
Version 2  mykey::v2
...     ...

With this approach, existing applications will always use the current version of the document, since the key is not changed. But this approach creates new documents that will be indexed by existing views.

For example, in the Beer Sample application, the following view is used to list the beer by name:

function (doc, meta) {
    if(doc.type && doc.type == "beer") {
        emit(doc.name);
    }
}


It is quite simple to "support" versioning without impacting the existing code, except the view itself. The new view needs to emit keys,value only for the current version of the document. This is the new view code:

function (doc, meta) {
    if(doc.type && doc.type == "beer" && (meta.id).indexOf("::v") == -1   ) {
        emit(doc.name);
    }
}

With this change the existing applications that are using this view will continue to work with the same behavior.

Implementing the versioning

Based on this design, when the application needs to version the document, the following logic should happen:
  1. Get the current version of the document
  2. Increment the version number (for example using another key that maintains the version number for each document)
  3. Create the version with the new key  "mykey::v1"
  4. Save the document current version
Let's look at the code in Java

  Object obj = client.get(key);
  if (obj != null) {
    // get the next version, create or use the key: mykey_version
    long version = client.incr(key + "_version", 1, 1); 
    String keyForVersion = key + "::v" + version; // mykey::v1
    try {
        client.set(keyForVersion, obj).get();
    } catch (Exception e) {
        logger.severe("Cannot save version "+ version + " for key "+ key +" - Error:"+ e.getMessage() );
    }
   }
   client.set(key, value);

Quite simple isn't?

The application can access the document using the key, but also get one version or the list of all versions, this is one of the reasons why it is interesting to create a key (mykey_version), and use it also to delete documents and related versions.

Based on the previous comment, the delete operation looks like:

  Object obj = client.get(key);
  // need to delete all the version first
  Object vObject = this.get(key + "_version");
  if (vObject != null) {
    long biggerVersion = Long.parseLong((String) vObject);
    try {
        // delete all the versions
        for (int i = 1; i <= biggerVersion; i++) {
            String versionKey = key + "::v" + i;
            client.delete(versionKey).get();
        }
        // delete the counter
        client.delete(key + "_version").get();
    } catch (InterruptedException e) {
      e.printStackTrace();
    } catch (ExecutionException e) {
      e.printStackTrace();
    }
  }
  client.delete(key);

Use versioning

As an example, I have created a small library available on GitHub https://github.com/tgrall/couchbase-how-to-versioning, this library extends the Couchbase Client and overrides some of the operations : set, replace and delete. (the basic one: no TLL, no durability) As I said before this is just an example.

Build and Install 

git clone https://github.com/tgrall/couchbase-how-to-versioning.git
cd how-to-versioning
mvn clean install

Then add this library to your project in addition to Couchbase Java Client, for example in your pom.xml
...
  
      com.couchbase.howtos
      couchbase-how-to-versioning
      1.0-SNAPSHOT
  
  
      couchbase
      couchbase-client
      1.1.8
  

...

Code your application

Create a document and version it:

 List uris = new LinkedList();
 uris.add(URI.create("http://127.0.0.1:8091/pools"));
 CouchbaseClientWithVersioning client = null
 try {
  client = new CouchbaseClientWithVersioning(uris, "default", "");
  String key = "key-001";
  client.set(key, "This is the original version");
  System.out.printf("Original '%s' .\n", client.get(key));
  client.set(key, "This is a new version", true); // create a new version
  System.out.printf("Current Version '%s' .\n", client.get(key));
  System.out.printf("Version 1 '%s' .\n", client.get(key, 1));
  client.set(key, "This is another version", true); // create a new version
  System.out.printf("All versions %s .\n", client.getAllVersions(key));
  client.deleteVersion(key, 1); // create a new version
  System.out.printf("All versions %s (after delete 1 version).\n", client.getAllVersions(key));
  client.delete(key); // create a new version
  System.out.printf("All versions %s (after delete the main key).\n", client.getAllVersions(key));
 } catch (Exception e) {
  e.printStackTrace();
 }
 if (client !=null) {
  client.shutdown();
 }

Quick explanation:
  • Line 5: instead of using the CouchbaseClient, the application uses the extended  CouchbaseClientWithVersioning class.
  • Line 7: create a new entry
  • Line 9: create a new version, the boolean value to "true" force the versioning of the document
  • The application use other methods such as get a specific version (line 11), get all versions (line 13), delete a specific version (line 14), and finally delete the key and all versions (line 16).
So using this approach the developer controls explicitly when to create a version, since he has to add the boolean parameter in the set operation. In this small sample library it is also possible to do auto versioning, in this case all set and replace calls will create a version, to achieve that the developer just needs to call the setAutoVersioning(true) method. Something like:

    client = new CouchbaseClientWithVersioning(uris, "default", "");
    client.setAutomaticVersionning(true);

With this approach you can provide versioning to your application with minimal code change. You can test it in the Beer Sample application, just do not forget to change the views as documenter above to only return current version of the documents.

Conclusion

As you can see doing versioning in Couchbase is not that complicated, but it is something that must be done by your application based on its requirements and constraints. You have many different solution and none of these options is perfect for all use cases.

In this specific sample code, I am working with a simple design where I create a copy of the documents for each version. With this approach also, it is interesting to mention that you can version "anything", not only JSON document but also any values.  As I said before, this is one possible approach, and like any design, it has some impact on the application or database, in this case most the database:
  • Increase the number of keys and documents
  • Double - or more- the number of operations, for example when updating a document, the application needs to get the current value, create a version, save the current version.
  • Consistency management when adding new version and incrementing the version number (need to deal with errors when creating a new version, deleting the versions and counter....)
Many features could be added to this easily, for example:
  • Limit to a specific number of version,
  • Enable the versioning only of replace() operation
  • Add specific attribute about versions in JSON document (for example date of the version)
  • ....

If you are using versioning in your Couchbase application feel free to comment or write a small article that describes the way your are doing it.

Wednesday, July 3, 2013

SQL to NoSQL : Copy your data from MySQL to Couchbase


TL;DR: Look at the project on Github.

Introduction

During my last interactions with the Couchbase community, I had the question how can I easily import my data from my current database into Couchbase. And my answer was always the same:
  • Take an ETL such as Talend to do it
  • Just write a small program to copy the data from your RDBMS to Couchbase...
So I have written this small program that allows you to import the content of a RDBMS into Couchbase. This tools could be used as it is, or you can look at the code to adapt it to your application.


The Tool: Couchbase SQL Importer

The Couchbase SQL Importer, available here, allows you with a simple command line to copy all -or part of- your SQL schema into Couchbase. Before explaining how to run this command, let's see how the data are stored into Couchbase when they are imported:
  • Each table row is imported a single JSON document
    • where each table column becomes a JSON attribute
  • Each document as a key made of the name of the table and a counter (increment)
The following concrete example, based on the MySQL World sample database, will help you to understand how it works. This database contains 3 tables : City, Country, CountryLanguage. The City table looks like:
+-------------+----------+------+-----+---------+----------------+
| Field       | Type     | Null | Key | Default | Extra          |
+-------------+----------+------+-----+---------+----------------+
| ID          | int(11)  | NO   | PRI | NULL    | auto_increment |
| Name        | char(35) | NO   |     |         |                |
| CountryCode | char(3)  | NO   |     |         |                |
| District    | char(20) | NO   |     |         |                |
| Population  | int(11)  | NO   |     | 0       |                |
+-------------+----------+------+-----+---------+----------------+

The JSON document that matches this table looks like the following:

city:3805
{ 
  "Name": "San Francisco",
  "District": "California",
  "ID": 3805,
  "Population": 776733,
  "CountryCode": "USA"
}


You see that here I am simply taking all the rows and "moving" them into Couchbase. This is a good first step to play with your dataset into Couchbase, but it is probably not the final model you want to use for your application; most of the time you will have to see when to use embedded documents, list of values, .. into your JSON documents.

In addition to the JSON document the tool create views based on the following logic:
  • a view that list all imported documents with the name of the "table" (aka type) as key
  • a view for each table with the primary key columns
View: all/by_type
{
  "rows": [
    {"key": "city", "value": 4079}, 
    {"key": "country", "value": 239}, 
    {"key": "countrylanguage", "value": 984}
   ]
}

As you can see this view allows you to get with a single Couchbase query the number of document by type. 

Also for each table/document type, a view is created where the key of the index is built from the table primary key. Let's for example query the "City" documents.

View: city/by_pk?reduce=false&limit=5
{
  "total_rows": 4079,
  "rows": [
    {"id": "city:1", "key": 1, "value": null}, 
    {"id": "city:2", "key": 2, "value": null}, 
    {"id": "city:3", "key": 3, "value": null}, 
    {"id": "city:4", "key": 4, "value": null},
    {"id": "city:5", "key": 5, "value": null}
  ]
}

The index key matches the value of the City.ID column.  When the primary key is made of multiple columns the key looks like:

View: CountryLanguage/by_pk?reduce=false&limit=5
{
  "total_rows": 984,
  "rows": [
    {"id": "countrylanguage:1", "key": ["ABW", "Dutch"], "value": null}, 
    {"id": "countrylanguage:2", "key": ["ABW", "English"], "value": null}, 
    {"id": "countrylanguage:3", "key": ["ABW", "Papiamento"], "value": null},
    {"id": "countrylanguage:4", "key": ["ABW", "Spanish"], "value": null},
    {"id": "countrylanguage:5", "key": ["AFG", "Balochi"], "value": null}
  ]
}


This view is built from the CountryLanguage table primary key made of CountryLanguage.CountryCode and CountryLanguage.Language columns.

+-------------+---------------+------+-----+---------+-------+
| Field       | Type          | Null | Key | Default | Extra |
+-------------+---------------+------+-----+---------+-------+
| CountryCode | char(3)       | NO   | PRI |         |       |
| Language    | char(30)      | NO   | PRI |         |       |
| IsOfficial  | enum('T','F') | NO   |     | F       |       |
| Percentage  | float(4,1)    | NO   |     | 0.0     |       |
+-------------+---------------+------+-----+---------+-------+


How to use Couchbase SQL Importer tool? 

The importer is a simple Java based command line utility, quite simple to use:

1. Download the CouchbaseSqlImporter.jar file from here. This file is contains all the dependencies to work with Couchbase: the Java Couchbase Client, and GSON.

2. Download the JDBC driver for the database you are using as data source. For this example I am using MySQL and I have download the driver for MySQL Site.

3. Configure the import using a properties file.
## SQL Information ##
sql.connection=jdbc:mysql://192.168.99.19:3306/world
sql.username=root
sql.password=password

## Couchbase Information ##
cb.uris=http://localhost:8091/pools
cb.bucket=default
cb.password=

## Import information
import.tables=ALL
import.createViews=true
import.typefield=type
import.fieldcase=lower

This sample properties file contains three sections :

  • The two first sections are used to configure the connections to your SQL database and Couchbase cluster (note that the bucket must be created first)
  • The third section allow you to configure the import itself
    • import.tables : ALL to import all tables, or a the list of tables you want to import, for example City, Country
    • import.createViews : true or false, to force the creation of the views.
    • import.typefield : this is use to add a new attribute in all documents that contains the "type".
    • import.fieldcase : null, lower, upper : this will force the case of the attributes name and the value of the type (City or city or CITY for example).
4. Run the tool !

java -cp "./CouchbaseSqlImporter.jar:./mysql-connector-java-5.1.25-bin.jar" com.couchbase.util.SqlImporter import.properties 

So you run the Java command with the proper classpath (-cp parameter).

And you are done, you can get your data from your SQL database into Couchbase.

If you are interested to see how it is working internally, you can take a look to the next paragraph.

The Code: How it works?


The main class of the tool is really simple  com.couchbase.util.SqlImporter, the process is:

1. Connect to the SQL database

2. Connect to Couchbase

3. Get the list of tables

4. For each tables execute a "select * from table"

  4.1. Analyze the ResultSetMetadata to get the list of columns
  
  4.2. Create a Java map for each rows where the key is the name of the columns and the value…is the value

  4.3. Serialize this Map into a GSON document and save it into Couchbase

The code is available in the ImportTable(String table) Java method.

One interesting point is that you can use and extend the code to deal with your application.

Conclusion

I have created this tool quickly to help some people in the community, if you are using it and need new features, let me know, using comment or pull request.


Tuesday, May 28, 2013

Six months as Technical Evangelist at Couchbase

Already 6 months! Already 6 months that I have joined Couchbase as Technical Evangelist. This is a good opportunity to take some time to look back.

So first of all what is a Developer/Technical Evangelist?
Hmm it depends of each company/product, but let me tell you what it is for me, inside Couchbase. This is one of the most exciting job I ever had. And I think it is the best job you can have when you are passionate about technology, and you like to share this passion with others. So my role as Technical Evangelist is to help the developers to adopt NoSQL technologies in general, and as you can guess Couchbase in particular.

Let's now see in more details what I have done during these past six months and why I am so happy about it. I have organized the different activities in three types:
  • Outbound activities : meet the developers
  • Online activities : reach even more developers
  • Inbound Activities : make the product better !

Outbound activities : meet the developers !

A large part of my activities for this first semester was made of conferences and meetups. All these events are great opportunities for me to talk about NoSQL and get more people to use Couchbase Server 2.0, here a short list of what I have done:
  • participated to many Couchbase Developer Days in various cities (Portland, Seattle, Vancouver, Oslo, Copenhagen, Stockholm, Munich, Amsterdam, Barcelona, Paris, ...), these are one day workshops where I am helping developers to get their hands dirty on Couchbase
  • participated to Couchconf Berlin and Couchbase [UK] our main European events where I met many Customer and key members of the community
  • submitted talks to conferences and adapt them to the conference, then spoken in various conferences about NoSQL and Couchbase (33Degree Warsaw,  NoSQL & Big Data Israel, Devoxx France, NoSQL Matters, and many others).
  • met many developers during user groups and meetups. I have to say that I have been very active there, and quite happy to see that NoSQL is a very hot topic for developers, and this in all languages.
  • delivered BrowBagLunches to various technical teams in companies 
Yes! Be a Technical Evangelist means, at least for me, be on the road. It is very nice to meet developers from various countries, different cultures, languages, and… this also means tasting many different types of food!

Another interesting thing when you work on a database/infrastructure layer is the fact that it is technology agnostic; you can access Couchbase with multiple programming languages: Java, .Net,Javascript/Node, Ruby, PHP, Python, C, … and even Go. So with this job I met developers with different backgrounds and views about application development. So yes when I am at a conference or meetup, I am suppose to "teach" something to people, but I have also learned a lot of things, and still doing it.

Online activities : reach even more developers!

Meeting developers during conferences is great but it, it is also very important to produce content to reach even more people, so I have :
  • written blog post about Couchbase usage, most of them based on feedback/questions from the community
  • created sample code to show how it works
  • monitored and answered questions on various sites and mailing lists, from Couchbase discussion forums, mailing lists, Stack Overflow, Quora and others...
This task is quite interesting because it is the moment where you can reach many developers and also get feedback from users, and understand how they are using the product. I have to say that I was not as productive as I was expected, mainly because I was traveling a lot during this period.

Another important thing about online activities, is the "Couchbase Community" itself, many users of Couchbase are creating content : blog posts, samples, new applications, or features - for example I am talking with a person that is developing a Dart Client for Couchbase, so as Technical Evangelist I am also working closely with the most active contributor.

Inbound Activities : make the product better !

So the ultimate goal of a Technical Evangelist at Couchbase is to "convert" developers to NoSQL/Couchbase and get them to talk about Couchbase. Meeting them online or during events is a way of achieving this; but it is also great to do it directly with the product. This means participating to the "development" of the product or its ecosystem. Here some of the things that I have done on this topic:
  • talked a lot with the development team, core developers, product managers, architects, … Quite exciting to work with so much smart people and have access to them. During this discussions I was able to comment the roadmap, influence features, but also it is all the time an opportunity to learn new things about Couchbase - and many other things around architecture, programming languages, take a look for example to this nice post from Damien Katz .
  • contributed some code, yes remember Couchbase is an open source project and it is quite easy to participate to the development. Obviously based on my skills I have only help a little bit with the Java and the Javascript SDK. So if like me you are interested to contribute to the project, take a look to this page: "Contributing Changes"
  • but the biggest contributions to the products are such like doc reviews, testing and writing bug reports, and this is very important and interesting, since once again it helps a lot with the product adoption by the developers.

So what?

As you can see the Technical Evangelist job is a quite exciting job, and one of the reason I really love it, it is simply because it allows me to do many different things, that are all related to the technology. Six months is still a very short period, I still have many things to learn and to with the team to be successful, such as be more present online (blog, sample code, technical article, screencast, ..), be accepted in more conferences, and code a little more (I have to finish for example the Couchbase Data Provider for Hibernate OGM, and many other ideas around application development experience) 


Finally, Couchbase needs you ! This is a good opportunity to say that Couchbase is always looking for talents, especially in the Technical/Developer Evangelist team, so do not hesitate to look at the different job openings and join the team !


Monday, April 29, 2013

Screencast : Fun with Couchbase, MapReduce and Twitter

I have created this simple screencast to show how you can, using Couchbase do some realtime analysis based on Twitter feed.

The key steps of this demonstration are

  1. Inject Tweets using a simple program available on my Github Couchbase-Twitter-Injector
  2. Create views to index and query the Tweets by
    • User name
    • Tags
    • Date
The views that I used in this demonstration are available at the bottom of this post.


Views:

Wednesday, March 6, 2013

Easy application development with Couchbase, Angular and Node

Note : This article has been written in March 2013, since Couchbase and its drivers have a changed a lot. I am not working with/for Couchbase anymore, with no time to udpate the code.
A friend of mine wants to build a simple system to capture ideas, and votes. Even if you can find many online services to do that, I think it is a good opportunity to show how easy it is to develop new application using a Couchbase and Node.js.

So how to start?
Some of us will start with the UI, other with the data, in this example I am starting with the model. The basics steps are :

  1. Model your documents
  2. Create Views
  3. Create Services
  4. Create the UI
  5. Improve your application by iteration
The sources of this sample application are available in Gihub :
https://github.com/tgrall/couchbase-node-ideas

Use the following command to clone the project locally :

git clone https://github.com/tgrall/couchbase-node-ideas.git

Note: my goal is not to provide a complete application, but to describe the key steps to develop an application.


Monday, February 18, 2013

How to get the latest document by date/time field?

I read this question on Twitter, let me answer the question in this short article.

First of all you need to be sure your documents have an attribute that contains a date ;), something like :

To get the "latest hired employee" you need to create a view, and emit the hire date as key. The important part is to check that this date is emitted in a format that is sorted properly, for example an array of value using dateToArray function, or the time as numerical value. In the following view I am using the date as an array like that I will be able to do some grouping but this is another topic. The view looks like the following:


Now that you have a view. You can now query it using the parameters:

  • descending = true
  • limit = 1
If you use Java SDK the code will look like the following :

Finally it is important when you work with views to understand how the index are managed by the server so be sure your read the chapter "Index Updates and the stale Parameter".

Wednesday, February 13, 2013

Introduction to Collated Views with Couchbase 2.0


Most of the applications have to deal with "master/detail" type of data:

  • breweries and beer
  • department and employees
  • invoices and items 
  • ...
This is necessary for example to create application view like the following:

With Couchbase, and many of the document oriented databases you have different ways to deal with this, you can:
  • Create a single document for each master and embed all the children in it
  • Create a master and child documents and link them using an attribute.
In the first case when all the information are stored in a single document it is quite easy to use the entire set of data and for example create a screen that shows all the information, but what about the second case?

In this post I am explaining how it is possible to use Couchbase views to deal with that an make it easy to create master/detail views.

As an ex-Oracle employee, I am using the infamous SCOTT schema with the DEPT and EMP tables, as the first example. Then at the end I will extend this to the beer sample data provided with Couchbase.

The Data

Couchbase is a schema-less database, and you can store “anything you want” into it, but for this you need to use JSON documents and create 2 types of document : “department” and “employee”.

The way we usually do that is using a technical attribute to type the document. So the employee and department document will look as follow :

Department
{
  "type": "dept",
  "id": 10,
  "name": "Accounting",
  "city": "New York"
}
Employee
{
  "type": "emp",
  "id": 7782,
  "name": "Blake",
  "job": "Clark",
  "manager": 7839,
  "salary": 2450,
  "dept_id": "dept__10"
}

This shows just the document, in Couchbase you have to associate a document to a key. For this example I am using a simple pattern : type__id , for these documents the keys will look like the following:
  • dept__10
  • emp__20

You can use any pattern to create a key, for example for the employee you could chose to put an email.  

Note the “dept_id” attribute in the employee document. This is the key of the department; you can see that as the “foreign key”. But remember, the relationship between the department and employee documents are managed entirely by the application, Couchbase Server does not enforce it.

I have created a Zip file that contains all the data, you can download it from here; and import the data into Couchbase using the cbdocloader utility. To import the data run the following command from a terminal window:

./cbdocloader -n 127.0.0.1:8091 -u Administrator -p password -b default ~/Downloads/emp-dept.zip 

You can learn more about the cbdocloader tool in the documentation.

The View

Queries inside Couchbase are based on views; and views build indexes, so we have to create a view, a "collated view" to be exact.

The idea behing a collated view is to produce an index where the keys are ordered so that a parent id appears first followed by its children.  So we are generating an index that will look like:

DEPT_10, Accounting
DEPT_10, Blake
DEPT_10, Miller
DEPT_20, Research
DEPT_20, Adams
DEPT_20, Ford
...


This is in fact quite easy to do with Couchbase views. The only trick here is to control the order and be sure the master is always the first one, just before its children.

So to control this we can create an compound key that contains the department id, a "sorting" element and the name (beer or brewery)

So the map function of the view looks like the following:

The key is composed of:
  • the department id extracted from the department document itself or from the employee document depending of the type of document
  • an arbitrary number that is used to control the ordering. I put 0 for the department, 1 for the employee
  • the name of the department or the employee, this also allows to sort the result by name
In addition to the key, this view is used to emit some information about the salary of the employees. The salary is simply the sum of the salary plus the commission when exists. The result of the view looks like:

With this view you can now use the result of the view to build report for your application. It is also possible to use parameters in your query to see only a part of the data, for example by departement, using for example startkey=["dept__20",0]&endkey=["dept__20",2] to view only the data -Department and Employees- of the deparment 20-Research.


The Beer Sample Application

You can create an equivalent view for the beer sample application where you print all the breweries and beers in the same report. The view is called "all_with_beers" in the design document "brewery". The view looks like:


Once you have publish it in production you can use it in the Beer Sample application, for this example I have modified the Java sample application.

Create a servlet to handle user request and on the /all URI.

The "BreweryAndBeerServlet" that calls the view using the following code :


The result of the query is set into the HttpRequest and the all.jsp page is executed. The JSP uses JSTL to print the information using the following code:
The JSP gets the items from the HTTP Request and loops on each items, then based on the type of the item the information is printed. The final result looks like :


This extension to the Beer Sample application is available here : https://github.com/tgrall/beersample-java/tree/BreweriesAndBeers

Saturday, December 1, 2012

New Adventure...

Yesterday was my last day at eXo... I have been working at eXo since 2008, and we have achieved many exciting things such as building eXo Platform, the open source social platform, and the Cloud-IDE allowing developers to build, test, and deploy applications online.

It was a great experience for me, but it is time for me to jump into a new adventure...

I am joining Couchbase as a Technical Evangelist for the EMEA Region. When I have started to work with NoSQL engines (starting with Google BigTable for Resultri) I really enjoyed the experience and the flexibility that it gives to the developers. Then I choose to work on a documented oriented database because it looks very natural to me, and evaluate the clustering capabilities. This is how I discovered Couchbase and its community.

This new job is a great opportunity for me to do the things that I really like about software:

  • Coding applications using different languages and frameworks
  • Understanding the sysops/devops related challenges when using a new product/technology
  • And finally probably the most important part; sharing it with others!
I look forward to sharing what I like about NoSQL and Couchbase and discuss with others about their experience or needs around NoSQL. 

See you soon online and in real life during conferences and meetups!

Couchbase Logo

Tuesday, November 13, 2012

Building a chat application using Node.js and Couchbase

After some basic articles about Couchbase installation, Node.js integration. Let's now dive into a more complete  example: a chat application.

The first version of the chat should be compliant with the following requirements:

  • web based
  • single room
  • user just needs to enter a login and he can start to interact with other connected users
  • user should be able to navigate into the chat history

The Couchbase Chat application is build using the following components
  • Node.js for the application
  • Couchbase to persist all the messages

I won't go in all the detail of the design of the Node.js application. You can find many example of Node based chat application. I prefere to focus on how I have design the persistence using Couchbase more than the application itself. If you want me to give more detail about the complete application feel free to drop me a message/comment and I will do it.

What are the challenges with persisting the messages?
Storing the information is quite easy, just "dump" the message information in your database. The challenge is more around the fact that user want to access the history of the messages. So the key point here is how to store the information in a way that it is easy to get back in a sorted fashion.

You will find many different ways of achieving that depending of the technology you are using and they query capabilities of your persistence engine. Using Couchbase you have two ways to access/find the data:

  • Using Views that allows you to query and secondary level index and do advanced operation such as sorting, query on key range, ...
  • Directly access the data using its key

In this post I will show you how you can use the the two options to build your application and retrieved information that are stored and retrieved in a specific order:

  • First Options: using a view to get the message history
  • Second Options: using a counter as a key for the messages

The source code of the application is available in Github : https://github.com/tgrall/couchbase-chat


Get the Couchbase connection

The following code is used to connect to Couchbase, once it is done, the Web server is started:

var express = require('express');
var app = express();
var http = require('http');
var server = http.createServer(app);
var io = require('socket.io').listen(server);

var driver = require('couchbase');

driver.connect({
 "username": "",
 "password": "",
 "hostname": "localhost:8091",
 "bucket": "default"}, 
 function(err, couchbase) {
  if (err) {
   throw (err)
  }

  server.listen(8080);

  app.get('/', function(req, res) {
   res.sendfile(__dirname + '/index.html');
  });
...
// Application code
// Socket.io events
...
});

Let's now see how Couchbase is used in the chat application.

First Option : Using views to get the message history

Post a new message
In this example messages are formatted using the following information:

{
  "type": "message",
  "user": "Tug",
  "message": "Hello all !",
  "timestamp": 1349836768909
}

The key is based on the timestamp and  the user name : 1349836768909-Tug. I am adding the user name to be sure that the key is unique. Like that I do not have to manage conflicts.

The insertion of the message :

  socket.on('postMessage', function(data) {
    // create a new message
    var message = {
      type: "message",
      user: socket.username,
      message: data,
      timestamp: Date.now()
    }
    var messageKey = message.timestamp +"-"+ message.user;
    io.sockets.emit('updateChatWindow', message);
    couchbase.set(messageKey, JSON.stringify(message),function(err) {  }); 
  });

  • The postMessage event is called by the client when the user post a new message. 
  • A new message object is created with : a type, the user, the message itself and a timestamp.
  • The message is sent to the different clients using the io.sockets.emit() function (line 10)
  • Finally the message is saved into Couchbase (line 11). As you can see the only thing you have to do is to send the Javascript object as a simple JSON String.
At this point your application work perfectly, all the connected user will see the new messages since they are sent by the server as soon as they are created. But it is not possible for a user to navigate in the chat history and see older messages.


Retrieve messages from Couchase 

As explained earlier, it is possible to use a view to retrieve the message from the database in a proper order.  The view looks like that:

function (doc, meta) { 
  if ( meta.type == "json" && doc.type == "message" ) {
   emit(doc.timestamp, null);
  }
}

Each time a new document is inserted in the database, if this is a JSON document and the type of this document is "message" the index will be updated. When this view is called the result looks like :

{"id":"1352733392477-JOHN","key":1352733392477,"value":null},

As you can see the id of the document (timestamp-username) is automatically inserted in the response.


You can use the following command to insert the view in your Couchbase Server: (configure the server address, port and bucket accordingly to your environment)
curl -X PUT -H 'Content-Type: application/json' http://127.0.0.1:8092/default/_design/chat -d '{"views":{"message_hisory":{"map":"function (doc, meta) {\n  \n  if ( meta.type == \"json\" && doc.type == \"message\" ) {\n   emit(doc.timestamp, null);\n  }\n}"}}}'


The application now calls the view using the following code

socket.on('showhistory', function(limit,startkey) {
  limit = (limit == undefined || limit == 0)? 5 : limit;
  var options = {"descending": "true", "limit" : limit, "stale" : "false"};
  if (startkey > 0) {
    options.startkey = startkey-1;
  }
  couchbase.view("chat","message_hisory", options , function(err, resp, view) {
    var rows = view.rows;
    var keys = new Array();
    for( var i = 0; i < rows.length ; i++  ) {
      keys.push( rows[i].id );
    }
    couchbase.get(keys,function(err, doc, meta) {
      socket.emit('updateChatWindow', doc, true);
    });
  });
});

When the client send a showHistory event the application capture this event and call the view with proper parameters to send back the list of messages to the client.

The options object contains the different parameters that will be used to call the view:
  • Use descending order to return the messages from the newest to the oldest
  • The number of message to return (limit)
  • Ask the view to update the index before returning the rows using the stale=false parameter.
  • Use startkey parameter if the client send a specific starting point. 
On line 7, the view "chat", "message_history" is called using the Node.js SDK, with the options object.

In the callback function, the application creates an array containing the document id (the keys of the document itself), then on line 13 the messages are retrieved from Couchbase using the get() function. (note: in this function I may have a small issue when multiple messages are sent in the same milliseconds and are just on the edge of the offset)

We have an interesting point to discuss, the view is used only to return the list of keys, and then do a multiple get call with the list of keys. This is most of the time better than returning too much data in the view.

In this first option, the application is using a view to get the message history. This is great, the only thing to look at closely is the fact that this approach uses index and the indexes are stored on the disk. So you need to be sure that the message is saved and the index updated before printing the message in the history, this is why the stale=false is required in this specific scenario.


Second Option : Using a counter as document Key

Let's see now how it is possible, with few changes in the the application, to do the same without using a view and only use the in memory keys. Using this approach the application only use the keys that are all in the memory of the server (memcached).

The application logic stays the same:
  1. When user connects to the server the system returns the last 5 messages from the database
  2. Each time the user posts a message it should be persisted
  3. The user can manually load older messages from the database to view the complete chat history

Post a new message
The key associated to the message is now a counter, and the application use the increment feature of Couchbase:
socket.on('postMessage', function(data) {
  // create a new message
  var message = {
    type: "message",
    user: socket.username,
    message: data,
    timestamp: Date.now()
  }
  couchbase.incr("chat:msg_count", function (data, error, key, cas, value ) { 
    var messageKey = "chat:"+ value;
    message.id = value;
    io.sockets.emit('updateChatWindow', message);
    couchbase.set(messageKey, JSON.stringify(message),function(err) {  }); 
    });
});

Once the message object is created (line 3), the application increments a value chat:msg_count that will be used as message counter (line 9). Note that the Node Couchbase SDK will automatically create the key if it is not present when the incr() method is called.

When the server has returned the new value, increment by 1 with a default value of 0, the callback function is call :

  • The value is used to create a new key for the message (line 10)
  • The message is push to the different users  (line 12)
  • Then the message is saved into Couchbase (line 13)


So what we have here:
  • a new item that contains the counter, associated to the key : chat:msg_count
  • each message will have a key that looks like chat:0, chat:1, chat:2, ... 

Retrieve messages from Couchase 
Retrieving the older messages from Couchbase is very easy since all the message contains a unique and sequencial id. The showHistory event just need to create a list of keys based on the correct number and get them from Couchbase.

socket.on('showHistory', function(limit,startkey) {
  var keys = new Array();
  for (i = startkey; i > (startkey-limit) && i >= 0 ; i--) {
    keys.push("chat:"+i);
  }
  couchbase.get(keys,function(err, doc, meta) {
    socket.emit('updateChatWindow', doc, true);
  });
});

The line 3-5 are used to create an array of keys, and then in line 6 this array is used to do a multiple get and send the messages to the client using socket.emit.

Here the logic is almost the same that the one used in the previous example. The only difference is the fact that we do not call Couchbase server to create the list of keys to use to print the message history.

Conclusion

As you can see when working with a NoSQL database like any other persistence store you often different ways of achieving the same thing. In this example I used two approaches, one using a view, the other one using the key directly.

The important thing here is to take some time when designing your application to see which approach will be the best for your application. In this example of the chat application I would probably stay with the "Key/Counter" approach that will be the most efficient in term of performance and scalability since it does not use secondary index.


Monday, November 5, 2012

Couchbase : Create a large dataset using Twitter and Java

An easy way to create large dataset when playing/demonstrating Couchbase -or any other NoSQL engine- is to inject Twitter feed into your database.

For this small application I am using:

In this example I am using Java to inject Tweets into Couchbase, you can obviously use another langage if you want to.

The sources of this project are available on my Github repository  Twitter Injector for Couchbase you can also download the Binary version here, and execute the application from the command line, see Run The Application paragraph. Do not forget to create your Twitter oAuth keys (see next paragraph) 


Create oAuth Keys

The first thing to do to be able to use the Twitter API is to create a set of keys. If you want to learn more about all these keys/tokens take a look to the oAuth protocol : http://oauth.net/


1. Log in into the Twitter Development Portal : https://dev.twitter.com/

2. Create a new Application 
Click on the "Create an App" link or go into the "User Menu > My Applications > Create a new application"

3. Enter the Application Details information


4. Click "Create Your Twitter Application" button

Your application's OAuth settings are now available :


5- Go down on the Application Settings page and click on the "Create My Access Token" button


You have now all the necessary information to create your application:
  • Consumer key 
  • Consumer secret
  • Access token
  • Access token secret

These keys will be uses in the twitter4j.properties file when running the Java application from the command line see


Create the Java Application

The following code is the main code of the application:

Some basic explanation:

  • The setUp() method simply reads the twitter4j.properties file from the classpath to build the Couchbase connection string.
  • The injectTweets opens the Couchbase connection -line 76- and calls the TwitterStream API. 
  • A Listener is created and will receive all the onStatus(Status status) from Twitter. The most important method is onStatus() that receive the message and save it into Couchbase. 
  • One interesting thing : since Couchbase is a JSON Document database it allows your to just take the JSON String and save it directly.
    cbClient.add(idStr,0 ,twitterMessage);

Packaging
To be able to execute the application directly from the Jar file, I am using the assembly plugin with the following informations from the pom.xml :


  ... 
  
    
     com.couchbase.demo.TwitterInjector
    
    
     .
    
  
  ...

Some information:

  • The mainClass entry allows you to set which class to execute when running java -jar command.
  • The Class-Path entry allows you to set the current directory as part of the classpath where the program will search for the twitter4j.properties file.
  • The assembly file is also configure to include all the dependencies (Twitter4J, Couchbase client  SDK, ...)
If you do want to build it from the sources, simply run :

mvn clean package

This will create the following Jar file ./target/CouchbaseTwitterInjector.jar


Run the Java Application

Before running the application you must create a twitter4j.properties file with the following information :

twitter4j.jsonStoreEnabled=true

oauth.consumerKey=[YOUR CONSUMER KEY]
oauth.consumerSecret=[YOUR CONSUMER SECRET KEY]
oauth.accessToken=[YOUR ACCESS TOKEN]
oauth.accessTokenSecret=[YOUR ACCESS TOKEN SECRET]

couchbase.uri.list=http://127.0.0.1:8091/pools
couchbase.bucket=default
couchbase.password=

Save the properties file and from the same location run:


jar -jar [path-to-jar]/CouchbaseTwitterInjector.jar


This will inject Tweets into your Couchbase Server. Enjoy !

Monday, September 24, 2012

Create a Simple Node.js and Couchbase application... on OS X

NOTE: The Couchbase Node.js Client Library is currently changing. I will update this article and source code once the API is stable.

I am currently playing a little bit with Node.js . It is quite fun! In this article I won't go in a a very complex application but just give you the basic steps to create your first Node.js+Couchbase application... on Mac OS X.

Installation

Couchbase 2.0 Beta:
You can take a look the first steps of my previous article to install Couchbase. The basics steps are:

  • Download Couchbase 2. 0 Beta 
  • Start the server (Run the "Couchbase Server" application)
  • Configure the server

Other Components :
  • Node.js
  • Couchbase Client Library (C version)
To install these two components I am using homebrew (aka brew).

Hmmm, what is homebrew?

Homebrew is a package manager for OS X that allows you to install, update and uninstall unix tools using very simple commands. You can find more information on the homebrew site. So let's start by installing homebrew itself.

From a terminal window:
ruby -e "$(curl -fsSkL raw.github.com/mxcl/homebrew/go)"

Then let's install node
brew install node

and finally install Couchbase Client Library
brew install https://github.com/couchbase/homebrew/raw/preview/Library/Formula/libcouchbase.rb

Coding

You are now ready to start the development of your application. 

Create a very simple application

1. Create a folder for your application
mkdir sample-app
cd sample-app
2. Create an app.js file and copy the following code:
var http = require("http");

function onRequest(request, response) {
  response.writeHead(200, {"Content-Type": "text/plain"});
  response.write("Hello World");
  response.end();
}

var server = http.createServer(onRequest);
server.listen(8080);

console.log("> SERVER STARTED");
I won't go in all the details about a node application; for this I invite you to read The Node Beginnger Book.

3. Start your server
node app.js
You should be able to access your application using http://localhost:8080
To stop your server just use ctrl+c.

Install and use Couchbase client for node.js

npm is the node package manager, that allows you to easily install node.js modules and manage dependencies for your application (I will present the dependency management in another post)

1. Install the Couchbase Client for node.js, using the following command
npm install couchbase
Couldn't be simpler! You can find more information about Couchbase Client for node on its npm page.

2. Lets now insert some data into Couchbase

Create a simple function that inserts some documents, and call it after server startup:
var http = require("http");

// load the Couchbase driver and connect to the cluster
var driver = require('couchbase');
var cb = new driver.Couchbase("localhost:8091", null, null, "default");

...
...

function insertData() {
 // insert employees in Couchbase
 var emps = [{
  "type": "employee",
  "id": 100,
  "name": "Thomas",
  "dept": "Sales",
  "salary": 5000
 }, {
  "type": "employee",
  "id": 200,
  "name": "John",
  "dept": "Development",
  "salary": 4500
 }, {
  "type": "employee",
  "id": 300,
  "name": "Jane",
  "dept": "Marketing",
  "salary": 5000
 }]

 // Insert the data in Couchbase using the add method ()
 for (index = 0; index < emps.length; index++) {
  cb.add(JSON.stringify(emps[index].id), JSON.stringify(emps[index]), 0, undefined, function(data, err, key, cas) {
   if (err && err != 12) { // 12 : LCB_KEY_EEXISTS  
    console.log("Failed to store object:\n" + err);
   }
  });
 }
}

server.listen(8080, insertData());

  • Lines 4-5 : load the Couchbase driver and connect to the server. I am using the complete list of parameter connect("server:port", "username", "password", "bucket"). But you can use the short version connect("server:port")
  • Lines 12-30 : just create JSON object that will be pushed in Couchbase.
  • Line 33 : the application just read each element of the array and insert them into Couchbase using the couchbase.add() function.
  • Lines 34-38 : the couchbase.add() function set the value only if it does not exist. If the value exists the error code LCB_KEY_EEXISTS (12) is return by the callback function

3. Start your server - node app.js - and check using the Admin Console that employees are inserted into your Couchbase instance. Note that node.js applications do not support hot deployment, so you need to bounce your application when changing the code.


Create and use Couchbase View

Let's now create and use a view to return the employee list.

1. All Couchbase views are accessible using a simple REST API, but you can also use the node.js plugin : baseview; so let's install this module:

npm install baseview


2. Create a new view from your application

You can use the Admin Console to create the view, but it is also possible to do it from your node.js code. So let's add the view programmatically in the insertData function.
var http = require("http");

// load the Couchbase driver and connect to the cluster
var driver = require('couchbase');
var cb = new driver.Couchbase("localhost:8091", null, null, "default");
// load the baseview module
var baseview = require('baseview')({url: 'http://localhost:8092', bucket: 'default'});


...
...

function insertData() {

 //create a new view
  baseview.setDesign('design_employees', {
     'basic_list': {
        'map': "function (doc, meta) { if(doc.type == 'employee') {emit(meta.id, doc.name);}}"
      }
    },
    function(err, res){
  if (err != null) console.log(err);
    }
  ); 

...

}
...
 
This new code, create a new view in Couchbase server:
  • line 7 : load the module and set the properties to call the view services
  • line 16-17 : call the basevie.setDesign() method, that create a view.
  • line 18 : set the map function that list all the employees

3. Let's now call the view in the onRequest function.

function onRequest(request, response) {
 response.writeHead(200, {
  "Content-Type": "text/plain"
 });
 response.write("See list of employees in the console");
 var params = 
  { 'descending'  : 'true'
  , 'include_docs' : 'true'
  };
 baseview.view('design_employees', 'basic_list', params, function(error, data) {
    for( var i = data.rows.length-1,length = data.rows.length ; i >= 0; i-- ) {
    var employee = data.rows[i].doc.json;
    console.log(employee);   
   } 
  });   
 response.end();
}


Calling the view is quite simple :

  • lines 6-8 : create an object to send view parameters. In this example I am just using descending, and include_docs to get the full document as part of the response. You can find the list of all the parameters you can use in the Couchbase documentation : Querying Using the REST API (The baseview module is using REST API to call the views).
  • line 10-14 : just loop on the result content, returned in the data variable, and print the employee information in the console.

Note: Because of the asynchronous nature of node.js, and my lack of experience with node, I was not able to send the list of employee to the HTTP response.

In another article I will explain how to integrate Couchbase with an node.js application based on Express and Socket.io, where I list the Employee in my the Web page.

Below, the complete code of this simple node.js application:
var http = require("http");
var driver = require('couchbase');
var cb = new driver.Couchbase("localhost:8091", null, null, "default");
var baseview = require('baseview')({url: 'http://127.0.0.1:8092',bucket: 'default'});

function onRequest(request, response) {
 response.writeHead(200, {
  "Content-Type": "text/plain"
 });
 response.write("See list of employees in the console");
 var params = {
  'descending': 'true',
  'include_docs': 'true'
 };
 baseview.view('design_employees', 'basic_list', params, function(error, data) {
  for (var i = data.rows.length - 1, length = data.rows.length; i >= 0; i--) {
   var employee = data.rows[i].doc.json;
   console.log(employee);
  }
 });
 response.end();
}

function insertData() {
 //create a new view
 baseview.setDesign('design_employees', {
  'basic_list': {
   'map': "function (doc, meta) { if(doc.type == 'employee') {emit(meta.id, doc.name);}}"
  }
 }, function(err, res) {
  if (err != null) console.log(err);
 });

 // insert employees in Couchbase
 var emps = [{
  "type": "employee",
  "id": 100,
  "name": "Thomas",
  "dept": "Sales",
  "salary": 5000
 }, {
  "type": "employee",
  "id": 200,
  "name": "John",
  "dept": "Development",
  "salary": 4500
 }, {
  "type": "employee",
  "id": 300,
  "name": "Jane",
  "dept": "Marketing",
  "salary": 5000
 }]


 // Insert the data in Couchbase using the add method ()
 for (index = 0; index < emps.length; index++) {
  cb.add(JSON.stringify(emps[index].id), JSON.stringify(emps[index]), 0, undefined, function(data, err, key, cas) {
   if (err && err != 12) { // 12 : LCB_KEY_EEXISTS  
    console.log("Failed to store object:\n" + err);
   }
  });
 }
}

var server = http.createServer(onRequest);

server.listen(8080, insertData());

console.log("> SERVER STARTED");

Friday, July 6, 2012

Couchbase 101 : install, store and query data

Introduction

In this post I just want to show how easily is to get started with Couchbase, and also explain how to “query” the data. The basic steps of this tutorial are:
  1. Install Couchbase 
  2. Create Data 
  3. Query Data 

I will try to post more articles, if I have time to show how to use Couchbase from your applications (starting with Java).

Prerequisites :
  •  Could not be simpler : Couchbase 2.0 available here. (Currently in Developer Preview)

Couchbase 101 : Insert and Query data

Installation

I am using Couchbase on Mac OS X, so let me describe the installation in this environment. If you are using other operating system just take a look to the Couchbase documentation.

Couchbase installation is very (very!) fast:
  1. Download the Mac OS X Zip file.
  2. Double-click the downloaded Zip installation file to extract the contents. This will create a single file, the Couchbase.app application.
  3. Drag and Drop the Couchbase.app to your chosen installation folder, such as the system Applications folder.

Start and Configure Couchbase Server


To start Couchbase Server, just double click on the Couchbase Server. Once the server is started, a new icon is added in the OS X Menu to indicate that the Server is up and running.

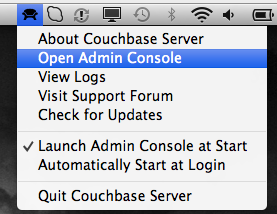
You can now configure your Couchbase instance, for this you just need to access the Admin Console, available at the following location http://127.0.0.1:8091 (change the IP address if needed) or simply by going in the Couchbase menu and click on Open Admin Console entry.


  1. Welcome Screen : Click Setup
  2. Set the disk and cluster configuration. On my instance I keep the default location for the on disk storage. Just configure the size of the memory usage for your instance, for example 800Mb. So far, we have a single instance, so no need to join a cluster.
  3. Choose to generate sample data. This will be interesting to learn more about data and views.
  4. Create the default bucket (use for testing only). A bucket is used by Couchbase to store data. It could be compared to a “database” in RDBMS world.
  5. Configure update notifications to be alerted when new version of Couchbase is released
  6. Configure the server with a final step with the administrator username and password
  7. When this is done you are automatically redirected to the Admin Console.
This is it! You are ready to use your Couchbase server.

Couchbase has many interesting features, especially around scalability and elasticity but for not in this article let's focus on the basics :
  • Insert some data and query them

Insert Data

Couchbase has many ways to manipulate data from you favorite programming language using the different client libraries : Java, Python, PHP, Ruby, .Net, C. For now let's use the Admin Console to create and query data.

Couchbase can store any type of data, but when you need to manipulate some data with a structure the best way is to use JSON Documents. So let's use the console and create documents.

To create new documents in your database, click on the "Data Buckets" tab. If you have installed the sample you see 2 buckets: default and gamesim-sample.

Let's create a new documents in the default bucket:
  1. Click on Documents button
  2. Click on Create Document
  3. Since each document must have an id for example 100.
  4. Couchbase save the document and add some metadata such as _rev, $flags, expiration
  5. Add new attributes to the document that describe an employee : Name, Departement and Salary, then save it. You just need to update the JSON object with values
    {
      "_id": "100",
      "name": "Thomas",
      "dept": "Sales",
      "salary": 5000
    }

Repeat the operation with some other employees :
200,Jason,Technology,5500
300,Mayla,Technology,7000
400,Nisha,Marketing,9500
500,Randy,Technology,6000
501,Ritu,Accounting,5400


You have now a list of employees in your database. That was easy isn't? Let's now query them.

Query Data

Access document directly from its ID

First of all you can quickly access a document using a simple HTTP request using its id. For example to access the Mayla with the id 300 just enter the following URL:
  • http://127.0.0.1:8092/default/300  
In this URL you have :
  • 8092 is the Couch API REST port used to access data (where 8091 is the port for the Admin console)
  • default is the bucket in which the document is stored
  • 300 is the id of the document

Search your data with queries

So we have seen how you can access one document. But what if my need is :
  •  "Give me all the employee of the Technology department"
To achieve such query it is necessary to create views. The views are used by Couchbase server to index and search your data. A view is a Map function written in JavaScript, that will generate a key value list that is compliant with logic you put in the Map function. Note that this key,value is now indexed and sorted by key. This is important when you query your data.
So let's create a new view from the Admin Console:
  1. Click on the Views tab (be sure you are on the default bucket)
  2. Click on the "Create Development View"
  3. Enter the Document and View name:
    • Document Name : _design/dev_dept
    • View Name : dept
  4. Cick Save
  5. Click on your View to edit it
Since we need to provide the list of employees that are part of a the Technology department, we need to create a view that use the department as key, so the map function looks like :

function (doc) {
  emit(doc.dept, null);
}

Save the view

This function takes the document and create a list that contains the "dept" as key and null as value. The value itself is not that important in our case. A simple rule will be : do not put too much data in the value since at the end Couchbase server creates an index with this map. Will see that Couchbase allows developer to easily get the document information when accessing a view.

Click on the "Show Results" button, the result will look like:
{"total_rows":6,"rows":[
  {"id":"501","key":"Accounting","value":null},
  {"id":"400","key":"Marketing","value":null},
  {"id":"100","key":"Sales","value":null},
  {"id":"200","key":"Technology","value":null},
  {"id":"300","key":"Technology","value":null},
  {"id":"500","key":"Technology","value":null}
]
}

As we have seen in earlier it is possible to access the document using a single URL, it is the same for views. You can for example access the view we have just created using the following URL:

Now it is possible to use query parameter to filter the results using the key parameter with the value entered using a JSON String :
The result of this query is now :

{"total_rows":6,"rows":[
  {"id":"200","key":"Technology","value":null},
  {"id":"300","key":"Technology","value":null},
  {"id":"500","key":"Technology","value":null}
]
}

You have many other parameters you can use when accessing a view to control the size, the time out, .... One of them is quite interesting is include_docs that ask Couchbase to include the full content of the document in the result. So if you call :

The result is :

{"total_rows":6,"rows":[
  {"id":"200","key":"Technology","value":null,"doc":  {"_id":"200","_rev":"1-1de6e6751608eada0000003200000000","$flags":0,"$expiration":0,"name":"Jason","dept":"Technology","salary":5500}},
  {"id":"300","key":"Technology","value":null,"doc":{"_id":"300","_rev":"1-f3e44cee742bfae10000003200000000","$flags":0,"$expiration":0,"name":"Mayla","dept":"Technology","salary":7000}},
  {"id":"500","key":"Technology","value":null,"doc":  {"_id":"500","_rev":"1-05780359aac8f3790000003200000000","$flags":0,"$expiration":0,"name":"Randy","dept":"Technology","salary":6000}}
]
}


Let's now create a little more complicated view to answer the following business requirement: "Give me all the employee with a salary between 5000 and 6000"
So now you know that you need to create a new view with the salary as key let's with the following Map function:

function (doc) {
  emit(doc.salary, null);
}

Couchbase is automatically sorting the key when creating/updating the index so, let's use the startkey and endkey parameter when calling the view. So let's call the view with from the following URL:
The result is :
{"total_rows":6,"rows":[
  {"id":"100","key":5000,"value":null,"doc":{"_id":"100","_rev":"1-0f33580d780014060000002e00000000","$flags":0,"$expiration":0,"name":"Thomas","dept":"Sales","salary":5000}},
  {"id":"501","key":5400,"value":null,"doc":{"_id":"501","_rev":"1-b1fe5bc79637720e0000003100000000","$flags":0,"$expiration":0,"name":"Ritu","dept":"Accounting","salary":5400}},
  {"id":"200","key":5500,"value":null,"doc":{"_id":"200","_rev":"1-1de6e6751608eada0000003200000000","$flags":0,"$expiration":0,"name":"Jason","dept":"Technology","salary":5500}},
  {"id":"500","key":6000,"value":null,"doc":{"_id":"500","_rev":"1-05780359aac8f3790000003200000000","$flags":0,"$expiration":0,"name":"Randy","dept":"Technology","salary":6000}}
]
}


Conclusion

In this short article you have learn how to:
  • Install Couchbase
  • Create data using the Admin Console
  • Query data with views
When I get more time I will write another article that do the same from Java, and other languages.