Wednesday, August 31, 2011

How to create a new Content List Template for eXo Platform 3

Introduction

eXo Platform provide many powerful features to manipulate and expose any type of content on a page. This is due to the fact that eXo stores the all the content in its Java Content Repository (JCR) and render the content on a page using Groovy Templates.

In this how to you will learn how you can create and use template that are used in the "Content List" portlet. For example in the ACME sample site you can show the content in 1 or 2 columns just by selecting different templates.


One Column View

Two Columns View

Creating a new Content List Template

In this section you will learn how to create a new template using the eXo IDE. Before writing the new template it is important to learn where the templates are stored.

eXo Content Service: Template Storage

Like many things inside eXo Platform, the eXo JCR is used to stored the templates. Templates are just a special type of content. This allows developers to easily write and test code without having complex deployment process, but also it make the life easy to export a running configuration to another one. For this you just need to use the standard JCR export/import features.
All the template and eXo Content Service configurations are stored inside a specific JCR workspace named : dms-system.
Each template type (Document Type, Content List, ....) is stored in a specific location. In our case we want to work on the "Content List" portlet so the template are stored inside the following folder:
  • /exo:ecm/views/templates/content-list-viewer/list/

Just for the fun of it, let's inspect this folder using the eXo CRaSH utility. If you are not interested you can jump to the next section. CRaSH is a shell for Java Content Repositories, the source of CRaSH is available on Google Code. So in a terminal window:
  1. Connect to CRaSH using telnet client:
    telnet 127.0.0.1 5000

  2. Connect to the JCR workspace using the following command:
    connect -u root -p gtn -c portal dms-system
    Where: -u is the user, -p the password, -c the Portal Container, and dms-system the workspace to use

  3. Move the the folder that contains all the templates for the Content List portlet:
    cd /exo:ecm/views/templates/content-list-viewer/list/

  4. List all the templates using the ls command


You can see the list of all the templates available for the Content List portlet.

Create a new template using the eXo IDE

Let's now create a new template using the IDE. For this be sure you are connected with a user that is part of the /Developer group. For simplicity reason I am using the root user.

The first important step is to go the the template location using the following steps:
  1. Access the IDE: click on My Spaces > IDE.

  2. Switch dms-system workspace: In the IDE menu click My Spaces >on Window > Select Workspace. And select the dms-system location in the dialog box and click OK.

  3. In the file structure on the left navigate to the template location :
    /exo:ecm/views/templates/content-list-viewer/list/

  4. Create a new template : In the IDE Menu click on File > New > Groovy Template

  5. Save the file as "MyNewTemplate.gtmpl"

  6. Enter some basic code:
    <h1>This is my template</h1>
    The date is <= new Date()>


  7. Save the template

  8. Go back to the Home page of the Acme Site

  9. Switch to Edit more by selecting Edit in the top right drop down list.

  10. Move you mouse at the top of the list of news and click on the preference button:

  11. In the list of templates, select the "MyNewTemplate", and click save.
We have created our new template, and use it on a page. We should now add some more interesting code to the template to really loop over the content based on the portlet configuration. But before this it is important to talk about caching and code modification.

eXo Template and Cache

To improve performances and a running system, the compiled version of the template is by default cached. This is why when you are modifying a template you do not see any change. We have two ways to work around this:
  • Run eXo Platform in Debug mode, in this case nothing is cached
  • Invalidate the cache manually using JMX
Since working with no cache at all is not an option, here is the MBean you have to use to invalidate the Template Service cache:
  • exo:portal="portal",service=cache,name="TemplateService", then call the clearCache operation on it
I do use JConsole for this, but you can use any method to call your MBeans operation.

Do not forget to call this operation each time you modify your template to be sure eXo recompile the template.

Accessing Content in the template

The current code of the template is really simple, you need now to add code to print the content in the page. For this we will be using some eXo Content programming, once again in the IDE.
If you are not interested to have detailed explanation of the code you can go to the complete source code here.
The template used by the Content List portlet is based on the following Java class org.exoplatform.wcm.webui.clv.UICLVPresentation, this class is responsible to set the complete context that you can use in the template such as:
  • The folder or category that contains the content to show. The "Folder Path" field in the preference screen
  • The display settings: title, number of documents, elements to show, ...
Here is the code to access these preferences:
    // import all the classes need in the template
    import javax.jcr.Node;
    import org.exoplatform.wcm.webui.paginator.UICustomizeablePaginator;
    import org.exoplatform.wcm.webui.clv.UICLVPortlet;
    import org.exoplatform.wcm.webui.Utils;
    import org.exoplatform.services.wcm.core.NodeLocation;

    // get the portlet preferences
    def header = uicomponent.getHeader();
    def isShowRssLink = uicomponent.isShowRssLink();
    def isShowHeader = uicomponent.isShowField(UICLVPortlet.PREFERENCE_SHOW_HEADER);
    def isShowRefresh = uicomponent.isShowField(UICLVPortlet.PREFERENCE_SHOW_REFRESH_BUTTON);      

    def isShowTitle = uicomponent.isShowField(UICLVPortlet.PREFERENCE_SHOW_TITLE);
    def isShowDate = uicomponent.isShowField(UICLVPortlet.PREFERENCE_SHOW_DATE_CREATED);
    def isShowLink = uicomponent.isShowField(UICLVPortlet.PREFERENCE_SHOW_LINK);
    def isShowReadmore = uicomponent.isShowField(UICLVPortlet.PREFERENCE_SHOW_READMORE);
    def isShowImage = uicomponent.isShowField(UICLVPortlet.PREFERENCE_SHOW_ILLUSTRATION) ;
    def isShowSummary = uicomponent.isShowField(UICLVPortlet.PREFERENCE_SHOW_SUMMARY);   

The uicomponent object is defined by the container class of the portlet that calls the template. This class contains many utility methods. In the code above I retrieve all the preferences of the portlet, since the name are self-explanatory it is not necessary to detail them, especially when you look at the preferences screen below:


Now that the template has all the preferences, it is time to loop on the content on print the information.
The eXo Content Service provides API to manipulate the content, including pagination of content. The idea behind this is to let the Content Service manage the JCR query, sorting, caching and pagination of data. So in your template you will mainly manage two classes to loop through the content to show:
  • uicomponent.getUIPageIterator() a paginator object that is configured based on the portlet preferences
  • uicomponent.getCurrentPageData() contains a list of the content (JCR Nodes) that should print on the current page
So let's print all the content of the page as a simple HTML list:
    <% for (viewNode in uicomponent.getCurrentPageData()) { def title = viewNode.getProperty("exo:title").getString(); print("
  • $title
  • "); } %>
Just copy this code in your template, save it, refresh the cache... and go to your page. You should see the list of the content in a simple HTML list.
On each content (Node), eXo Content API provides some helper method to easily manipulate the content and avoid using the JCR API directly. In the following code you can see the most important methods accessing content properties:
        def itemName = viewNode.getName();
        def itemLink = uicomponent.getURL(viewNode);  
        def webdDavLink = uicomponent.getWebdavURL(viewNode);    
        def itemDateCreated = uicomponent.getCreatedDate(viewNode);
        def itemModifiedDate = uicomponent.getModifiedDate(viewNode);
        def itemAuthor = uicomponent.getAuthor(viewNode);     
        def imgSrc = uicomponent.getIllustrativeImage(viewNode);
        def itemTitle = uicomponent.getTitle(viewNode);
        def itemSummary = uicomponent.getSummary(viewNode);
One important point is the fact that these methods are responsible of many things, for example: formatting dates, returning complete URLs depending of the context of the portlet.
Based on these methods you can now work on the presentation of the information on the page. Let's for example print the image, the title and allow user to click on the title to go in the detail view of the article. This is done simply using the following code:
<%
  for (viewNode in uicomponent.getCurrentPageData()) {
    def itemName = viewNode.getName();
    def itemLink = uicomponent.getURL(viewNode);  
    def webdDavLink = uicomponent.getWebdavURL(viewNode);    
    def itemDateCreated = uicomponent.getCreatedDate(viewNode);
    def itemModifiedDate = uicomponent.getModifiedDate(viewNode);
    def itemAuthor = uicomponent.getAuthor(viewNode);     
    def imgSrc = uicomponent.getIllustrativeImage(viewNode);
    def itemTitle = uicomponent.getTitle(viewNode);
    def itemSummary = uicomponent.getSummary(viewNode);
    
    %> 

$itemTitle

$itemSummary
<% } %>
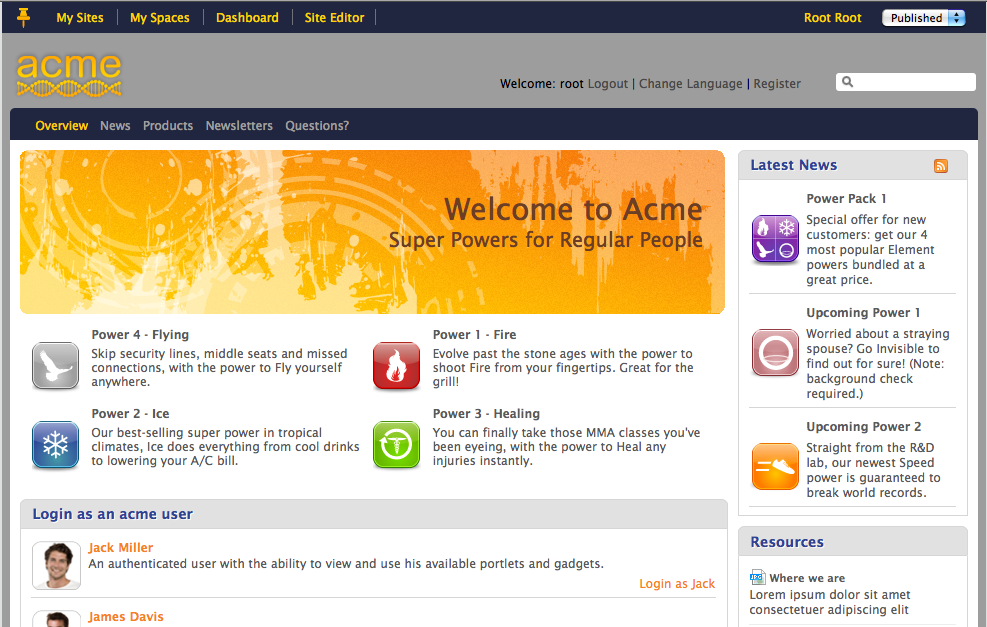
For simplicity reason, this code does not manage any null value. Also the template do not deal with the portlet preferences such as the "Header", "RSS" links and so on, do not hesitate to do it if you want. The Web site should look like the following image:


The last important point is to add the support for the in context editing that allows the user to edit the content directly from the template. Once again this is done with a method of the uicomponent object, that create a DIV around the content. Let's add this to the template:
<%
  for (viewNode in uicomponent.getCurrentPageData()) {
    def itemName = viewNode.getName();
    def itemLink = uicomponent.getURL(viewNode);  
    def webdDavLink = uicomponent.getWebdavURL(viewNode);    
    def itemDateCreated = uicomponent.getCreatedDate(viewNode);
    def itemModifiedDate = uicomponent.getModifiedDate(viewNode);
    def itemAuthor = uicomponent.getAuthor(viewNode);     
    def imgSrc = uicomponent.getIllustrativeImage(viewNode);
    def itemTitle = uicomponent.getTitle(viewNode);
    def itemSummary = uicomponent.getSummary(viewNode);
    
    %> 
<%=uicomponent.addQuickEditDiv("MyTemplateContentEditor", viewNode)%>

$itemTitle

$itemSummary < /div>
<% } %>
The lines 15 and 19 are new in this template and provide support for Quick Edit feature.

Done! We have created a new template for eXo Platform Content Service using embedded IDE.

Conclusion

In this article you have learned how to create a new template for eXo Content Service, with some basic steps:

  • Create a new Groovy Template using the eXo IDE
  • Edit this template using the eXo Java Content API
  • Configure your Content List portlet instance on a page to select the new template

You can now create your own templates and use your imagination to add cool features to your site (for example the carrousels you see on the eXo site are using custom CLV template.)

Monday, April 11, 2011

How to protect your REST service and Gadget in eXo Platform

During a partner workshop I was showing to the developers how the eXo IDE can help them to develop new features quickly and push them to the users in few minutes. A person asked me if it is possible to put some restriction in services and gadgets based on user profile.
As you can guess the answer is YES WE CAN!

  • How to access the security context in a REST service
  • How to check is a user is member of a group and manage permission from this information
  • How to consume this service in a gadget and leverage the security to protect resources
Not-authorized
Authorized
If you are not interested to follow steps by step the explanations you can directly jump to the complete REST Service code or download the full eXo IDE Project from GitHub

Access the User Profile from your REST Service

As you probably know eXo Platform uses JAX-RS as API to develop and deploy REST Services. eXo developers can create REST services using their favorite Java IDE, but here I am using the eXo IDE package with eXo Platform.

To access the security and user information in your service method it is possible to use the SecurityContext class of the JAX-RS API. Your method signature will look like:
import javax.ws.rs.Path
import javax.ws.rs.GET
import javax.ws.rs.PathParam
import javax.ws.rs.core.Response
import javax.ws.rs.core.MediaType
import javax.ws.rs.Produces
import javax.ws.rs.core.SecurityContext
import javax.ws.rs.core.Context

@Path("/system")
@Produces("application/json")
public class SystemInformationService {

  @GET
  @Path("information")
  public Response getSystemInfo(@Context SecurityContext sc) {
    sc.getUserPrincipal();   
    return Response.ok("foo", MediaType.APPLICATION_JSON).build();    
  }
  
}
 
In lines 7 and 8, I import the classes needed to inject the security context in the method getSystemInfo() in line 16. For now let's forget about the other part of the code.
With the Security Context object you can now access many things in your code. Two methods are quite interesting for this example: getUserPrincipal() and isUserInRole(), since our goal is to check if a user is allowed to execute or not a part of the business logic.
It is important here to remember that we cannot directly use the isUserInRole() method since this method uses the logical JavaEE roles that are defined at the Java application level. In our case we are interested to know if a user is present in a "eXo User Identity" Group, for example member of the /platform/administrators group. This information is populated during the login process and comes from the user provider that could be LDAP, the eXo Database or JCR, or any other source since developers can extend this API to plug their own provider.
Let's create an helper method that check, using the eXo Identity Service, if the user that executes the method is present in a group.
...
import org.exoplatform.container.ExoContainer;
import org.exoplatform.container.ExoContainerContext;
import org.exoplatform.container.component.ComponentPlugin;
import org.exoplatform.services.security.Identity;
import org.exoplatform.services.security.IdentityRegistry;
...
...

  private boolean isMemberOf(String username,String group) {
    ExoContainer container = ExoContainerContext.getCurrentContainer();
    IdentityRegistry identityRegistry = (IdentityRegistry) container.getComponentInstanceOfType(IdentityRegistry.class);
    Identity identity = identityRegistry.getIdentity(username);
    return identity.isMemberOf( group );
  }
So this method is quite simple, it takes as parameter:
  • the name of the user, that you can get from the UserPrincipal.getName() method
  • the eXo Group you want to check, for example /platform/administrator
You can now call this method from your resource to check the user, and code the "permission business logic". The method could now looks like:

...

  @GET
  @Path("information")
  public Response getSystemInfo(@Context SecurityContext sc) {
    String groupToCheck = "/platform/administrators";
    String response = "";
    if (sc.getUserPrincipal() == null || !this.isMemberOf(sc.getUserPrincipal().getName(), groupToCheck) ) {
      response = "NOT-ALLOWED";
    } else {
      response = "ALLOWED";
    }   
    return Response.ok(  response   , MediaType.APPLICATION_JSON).build();
  }

...
In this example for simplicity reason I have hard coded the group to check, you can obviously use smarter code to user external configuration to inject a list of group to check for example. I manage the security logic of my method using simple if statement and return a string. You can also depending of your needs, manage the status of your response and use HTTP Code for example return an HTTP 403. For this you just need to return a different response using following code:
    return Response.status(Response.Status.FORBIDDEN).build();
For simplicity reason I will stay with a single Response status (OK) and manage the permission in my client code.

Complete REST Service

Let's take a look to the full service now, this service allows administrators to get the list of the System Properties, other users get an status string "NOT-ALLOWED":
import javax.ws.rs.Path
import javax.ws.rs.GET
import javax.ws.rs.PathParam
import javax.ws.rs.core.Response
import javax.ws.rs.core.MediaType
import javax.ws.rs.core.CacheControl
import javax.ws.rs.Produces
import javax.ws.rs.core.SecurityContext
import javax.ws.rs.core.Context

import org.exoplatform.container.ExoContainer;
import org.exoplatform.container.ExoContainerContext;
import org.exoplatform.container.component.ComponentPlugin;
import org.exoplatform.services.security.Identity;
import org.exoplatform.services.security.IdentityRegistry;

@Path("/system")
@Produces("application/json")
public class SystemInformationService {
  
 
  @GET
  @Path("information")
  public Response getSystemInfo(@Context SecurityContext sc) {
    String groupToCheck = "/platform/administrators";
    SimpleResponseWrapper response = new SimpleResponseWrapper();
    String status = "";
    if (sc.getUserPrincipal() == null || !this.isMemberOf(sc.getUserPrincipal().getName(), groupToCheck) ) {
      response.status = "NOT-ALLOWED";
      } else {
        response.status = "OK";
        response.data = System.getProperties();
     
     }  
  
       CacheControl cacheControl = new CacheControl();
       cacheControl.setNoCache(true);
       cacheControl.setNoStore(true);
       return Response.ok(  response   , MediaType.APPLICATION_JSON).cacheControl(cacheControl).build();    
      }
         
      private boolean isMemberOf(String username,String role) {
        ExoContainer container = ExoContainerContext.getCurrentContainer();
        IdentityRegistry identityRegistry = (IdentityRegistry) container.getComponentInstanceOfType(IdentityRegistry.class);
        Identity identity = identityRegistry.getIdentity(username);
        return identity.isMemberOf( role );
      }
      
    }
 
public class SimpleResponseWrapper {
      String status;
      Object data;
}
      
To summarize:
  • Line 24 : the SecurityContext is injected to the method
  • Line 26 : Initialization of a simple ResponseWrapper defined on line 51, that contains a status and data. That will be serialized in JSON by the eXo REST engine.
  • Line 28 : the method check if a user is connected and member of /platform/administrator. If not it send response with the status NO-ALLOWED.
  • Line 31/32 : The response object is sent. This response contains an OK status and the data (system properties list)
  • Line 42 : Using the eXo Identity Service, the method check if the connected user is member of a specific group.

Consume the service into a Gadget

I can now take this service and consume it into an Gadget. I also develop this Gadget using the eXo IDE.
The following code shows the Javascript part of the Gadget that calls the service, check the security and push the response content in Gadget body. For productivity I use JQuery framework.
    
Here some quick explanation about this code:
  • Line 23: To call the REST service, I use the $.getJSON() method. This method is really easy to use when you are executing the Gadget is in the same container than the portal that consumes it. When you are using the gadget.io.MakeRequest is interesting to proxy a request and you need to re-authenticate, for example using oAuth.
  • Line 3 : This is the call back method, as you can see in this method I use the ResponseWrapper to check the code in the status attribute. Depending of the status OK or not I do print the value.

Conclusion


In this how-to you have learned how to:
  • Get the security context in your REST Service
  • Check the membership of a user using the eXo Identity Service
  • Create a gadget that consume this service and expose only data to user with correct profile
  • Download the full project from GitHub

Wednesday, March 16, 2011

eXo Cloud IDE : develop for the Cloud on the Cloud

Yesterday, eXo has launched a new cloud based service: the eXo Cloud IDE. This IDE is an online service that facilitates the development of gadgets and mashups that could be deployed directly to a PaaS.

Before launching this service on the Cloud we, eXo team and customers, have used the IDE embedded in the eXo Platform to extend our intranet and customer deployments (some of the modules that we have developed live on our intranet are available as plugins on the eXo Resource Center).
This IDE is the last mile between the users and the developers. It provides a way to add new services asked by business users at a lower cost with a good time to market. And all this based on standards that corporate and Web developers like : REST Services using JAX-RS and UI based on OpenSocial gadgets in which you can leverage all the cool and powerful features of HTML5.

What eXo has launched yesterday is a big step for developers since you can now develop, test and deploy your gadgets and services online, and this in your "personal environment" using eXo Cloud IDE supports multi-tenancy. I won't go in all the features of the IDE since you can test it yourself by joining the beta program and look at this video:

eXo Cloud IDE resources:

Tuesday, March 1, 2011

How to calculate the size of a folder in JCR (Java Content Repository)?

Today I was working with a partner in Paris and he wanted to know how to calculate the size of a specific folder in the eXo Java Content Repository (JCR).

For this specific need the goal is to calculate the size of all the documents stored inside a specific location in the content repository. This could be used for example to manage quotas, estimate the size of a shared or personal storage, ... For this specific sample I will only take in consideration the size of the binary part of the document stored in the repository; this means I will not pay attention to the various attributes and meta-data that are also stored, neither the full text index created by Lucene that is embedded in eXo JCR.

How the files are stored in the JCR?

Files are stored in eXo JCR in the standard node type nt:file (and nt:resource). So for this example I will simply list all the nt:file of a folder and aggregate the size of the file itself. It is important to understand how JCR is storing the binary content. The best way to understand it, is to view it. For that I am using the print information given by  CRaSH, a shell for content repository developed by eXo team and lead by Julien Viet. Here the structure of a PDF document :

/Documents/jsr170-1.0.pdf
+-properties
| +-jcr:primaryType: nt:file
| +-jcr:mixinTypes: [mix:referenceable,mix:versionable]
| +-jcr:uuid: '6b89b6f0c0a8006530a8617df51bb0d7'
| +-jcr:created: 2011-02-28T10:11:50.770+01:00
+-children
| +-/Groups/spaces/intranet_v2/Documents/Technical/jsr170-1.0.pdf/jcr:content

As you can see in this node the 'binary' is not visible, nothing bad here. As written in the specification in the section 6.7.22.6 nt:file, the binary content is an attribute of the child node jcr:content that is exposed below:
/Groups/spaces/intranet_v2/Documents/Technical/jsr170-1.0.pdf/jcr:content
+-properties
| +-jcr:primaryType: nt:resource
| +-jcr:mixinTypes: [exo:owneable,exo:datetime,dc:elementSet]
| +-jcr:uuid: '6b89b6f7c0a80065735b1a8853d389d0'
| +-jcr:data: 
| +-jcr:encoding: 'UTF-8'
| +-jcr:lastModified: 2011-02-28T10:11:50.767+01:00
| +-jcr:mimeType: 'application/pdf'
+-children

You can see now that the jcr:content contains some interesting attributes:
  • jcr:mimeType
  • jcr:data this is where the binary content, the PDF itself , is
So using the JCR API you just need to get the content length using the following java code:
   node.getProperty("jcr:content/jcr:data").getLength()

This returns the number of bits of the binary data. So to calculate the size of a folder you just need to navigate in all the documents (nt:file or jcr:content) and cumulate the size of all the files. In this following code, I am calculating the size of the folder "/Documents" by navigating into all the files contains in this folder and subfolders. (I could have chose to query all the jcr:content type instead of nt:file)

   Session session = getSession(); // use RepositoryService or context to get a session
   QueryManager manager = session.getWorkspace().getQueryManager();   
   String queryStatement = "select * from nt:file where (jcr:path LIKE '/Documents/%')";
   Query query = manager.createQuery(queryStatement, Query.SQL);
   NodeIterator nodeIterator = query.execute().getNodes();
   Node node = null;
   long totalSizeInMb = 0;
   
   while (nodeIterator.hasNext()) {
     node = nodeIterator.next();
     totalSizeInMb = totalSizeInMb + node.getProperty("jcr:content/jcr:data").getLength() / (1024*1024);
   }

As you can guess since we are navigating in the hierarchy you have to be very careful when using such query. This example is just a simple code sample to show you some of the cool features provided by the JCR API.


Sunday, January 2, 2011

iOS 101: How to convert a String to a NSDate

During my vacations, I took some time to play with iOS development. I have been struggling with many small issues... This is the price to pay when learning a new technology, and this is part of the fun of doing it. I will try to document some of these issues in articles...  Let's start with a very common story : working with date.

Objective-C and iOS SDK provide a class to help formatting date (marshaling and unmarshaling), this class is NSDateFormatter. No surprise, the NSDateFormatter uses the Unicode Date Format Patterns.

A small example of date creating from a string:

    NSDateFormatter *dateFormatter = [[NSDateFormatter alloc]init];
    [dateFormatter setDateFormat:@"yyyy-MM-dd"];
    NSDate *date = [dateFormatter dateFromString:publicationDate ];
    [dateFormatter release];
     // use your date object

The date that I have to create from a sting looks like "2010-11-12". So I do not have any time information. When I do convert this string with the code above, the result is  "2010-11-11 23:00:00 +0000". As you can see the date is calculated from my current time zone, small reminder I am in France. So the "date" object itself is perfectly fine, but in my example I want to have the date independently of the time.

To be able to manage the date without any time/timezone information, I can force the timezone I want to use when using the  NSDateFormatter class. I just need to use the setTimeZone instance method.
The code looks like that now (see line#3):
    NSDateFormatter *dateFormatter = [[NSDateFormatter alloc]init];
    [dateFormatter setDateFormat:@"yyyy-MM-dd"];
    [dateFormatter setTimeZone:[NSTimeZone timeZoneForSecondsFromGMT:0]];
    NSDate *date = [dateFormatter dateFromString:publicationDate ];
    [dateFormatter release];
     // use your date object

Hope that helps!

Friday, October 29, 2010

What Apple’s Announcement Really Means to Java Developers

Hey Steve, keep the bean in the Apple!

The news from last week that grabbed the attention of many Java developers was Apple’s announcement of its intentions to deprecate Java in the latest OS X 10.6 update. One sentence stood out in particular, “Developers should not rely on the Apple-supplied Java runtime being present in future versions of Mac OS X,” and raised the question: should Java developers (many of whom, like me, develop on Macs) freak out?

I don’t think so. (Though it prompted additional speculation and follow-on news stories.)

Let’s be realistic. Most applications run on the server side, on Unix/Linux and/or Windows Server – which has nothing to do with Apple or Mac OS X. And more and more applications are running on the cloud, where the language isn’t necessarily irrelevant, but certainly less important than the services that the application exposes. And I’m sure Java will have a big role in ‘development in the cloud,’ as we can already see with Google AppEngine and the VMWare/SpringSource effort.

I think the more interesting question to ask is “Why did Apple do this?”

I believe this is related Apple’s other big news last week: the new “Mac App Store,” which looks like an effort to have one single technology and language to develop “official” applications for Mac. In fact, for all Apple platforms running OS X and iOS, developers should use X Code and Objective C. That’s fine with me, as I enjoy developing small apps for my iPhone and iPad in my spare time, using these tools. But at eXo, many of our developers are using Java, often on Macs, to build our software.

We’re not talking about the same kind of applications. If, in the future, Java does not exist on Macs, it will not cause enterprise developers to abandon Java, but simply force them to move away from their Macs. Personally, I don’t want that to happen. I switched to Mac in 2001, and I’ve been a big fan of all Apple products ever since (most of my extended family are now also on Macs, and they couldn’t care less about Java).

As a Java developer, do I switch back to PC now? Unlikely. I am very confident (overconfident?) that Java will still be present on OS X. The difference is that Apple will simply stop caring about it -- the same way that Microsoft doesn’t care now. I cannot believe that Apple will stop/block Java on their platform. So the future of Java in general, and now on Mac, is fully under the control of the Java community, driven by Oracle and OpenJDK. I am sure we will find many skilled “MacAddicts” to maintain and improve Java on OS X, to at least allow Java developers to run their favorite IDE and test their applications before deploying them on the servers -- keeping the “Write Once, Run Anywhere” a reality (almost...). The only “bad” part is the fact that “Java Desktop” will not borrow any of the cool features of Apple Mac OS X. Not a big deal, since Java Desktop has never been that successful anyway.

So my advice to fellow Java developers is this: if you care, be vocal. Let’s make sure Apple lets the community drive the future of Java on Mac, since the future of the Java platform is still very exciting for many of us.

Original Post on eXo Blog.

Sunday, February 28, 2010

Create and Deploy a JAX-RS REST service on Google App Engine

In this article you will learn how to create a REST service using JAX-RS reference implementation (Jersey) and deploy it on Google AppEngine.

Prerequisites

For this tutorial you will need:
  • a Google AppEngine account : http://code.google.com/appengine/
  • Eclipse Galileo (3.5.x)
  • Google App Engine SDK for Java

    • Install the Google Plugin for Eclipse as documented here (Check that you are using the release 1.3.1 of the GAE Java SDK, if not download it and configure the plugin to use it)
    • it is also useful to have the AppEngine documentation locally, you can download it from here.
  • JAX-RS Reference Implementation, be sure you take the Jersey 1.1.5 release. You can download it from here.

    • Unzip the file in a directory that we will call $JERSEY_HOME
  • JAXB 2.2 Implementation to simplify the marshalling/unmarshalling of the XML, and also facilitate the JSON support. Download it from here 


    • Install it using thejava -jar JAXB2_20091104.jar command.  The installation directory of JAXB will be called $JAXB_HOME

Creating new application

To create a new App Engine project in Eclipse:
  1. Click on the "New Web Application Project" button in the toolbar . It is also possible to do it using the menu File > Web Application Project

  2. The "Create a Web Application Project" wizard opens:
  • Project Name: EmployeeService
  • Package : com.grallandco.employee.service
  • Uncheck "Use Google Web Toolkit"
  • Check that the SDK version your are using is "App Engine 1.3.0"; if not configure the project to use it.
  • The screen should look like the following screen :


  • Click Finish

  • The project should look like the following screen :


Running the application

The App Egine SDK, installed with the Eclipse plugin contains a Web server (based on Jetty), that could be used for testing and debugging. To test that your application has been created correctly select the menu Run > Run As > Web Application. I personnaly most of the time run my server using the debug command Run > DebugAs > Web Application. In debug mode you can change source code and test is without restarting the server.

The web server is starting automatically, you should see the following message in the Eclipse console

The server is running at http://localhost:8080/

You can access the application, and the sample servlet that has been created using the URL: http://localhost:8080/employeeservice

To stop the server, click on the terminate button in the Eclipse console.

Configuring the REST support in the application

To be able to create and run REST services in your application you need to:
  • Add the JAX-RS, JAXB Jars in your project and application
  • Configure the web application (web.xml) to handle REST requests
Add JAX-RS, JAXB to your project
  1. Right click on the project and select menu entry Build Path > Configure Build Path...
  2. Click on the Add External JARs button

  3. Select all the JARs located in $JERSEY_HOME/lib  and $JAXB_HOME/lib folders. You can for better visibility and reuse create a user library with all these JARs
  4. You also need to copy the JARs in the web-inf/lib directory of your application, this step is mandatory to be sure that the JARs are included in the application when deployed to App Engine.
    Note: I do not like this step. I would prefer to do that by configuration of the build path, to automatically add the JARs to the WEB-INF/lib directory when executing/deploying the application. Unfortunately I did not find the way to do it, so if you know it, feel free to post a comment and I will update the article.

Configure the web application

In this step you will register a new URI to handle REST requests. To do that you need to register a new servlet that is using the Jersey API and configure it to a specific URI (eg: /ressources  and/or /rest) and configure what are the Java packages that contain the REST implementation classes. So you need to modify the web.xml of your application with the following entries:

  <servlet>
    <servlet-name>Jersey Web Application</servlet-name>
     <servlet-class>com.sun.jersey.spi.container.servlet.ServletContainer</servlet-class>
     <init-param>
     <param-name>com.sun.jersey.config.property.packages</param-name>
     <param-value>com.grallandco.employee.service.rest.impl</param-value>
     </init-param>
     <load-on-startup>1</load-on-startup>
  </servlet>
  <servlet-mapping>
    <servlet-name>Jersey Web Application</servlet-name>
    <url-pattern>/resources/*</url-pattern>
  </servlet-mapping>
   <servlet-mapping>
    <servlet-name>Jersey Web Application</servlet-name>
    <url-pattern>/rest/*</url-pattern>
  </servlet-mapping>


This servlet that will answer to the /resources/ and /rest/ URL. The configuration parameter com.sun.jersey.config.property.packages is used by Jersey to list the packages where REST services implementation are located.Note that you can put as many package as you need to, you just need to separate the package names by a ; .


Creating a simple REST Service to test the environment

The project is now ready to contain REST service. It is time to create one.Create for example the class com.grallandco.employee.service.rest.impl.HelloWorldResource, be sure to use the package name that you have configured in the web.xml for the Jersey servlet, based on the configuration we have made in previous step the package is com.grallandco.employee.service.rest.impl

Here a sample class with the JAX-RS annotations:
package com.grallandco.employee.service.rest.impl;
import javax.ws.rs.Path;
import javax.ws.rs.GET;
import javax.ws.rs.Produces;
@Path("/hr/")
public class EmployeeResource {
 
 @GET
 @Produces("text/plain")
 @Path("/employee") 
 public String getEmployee() {
        return "Hello World!";
    }
}
You should be able to test it, stop the server and run it again, enter the following URL in your browser:
http://localhost:8080/resources/hr/employee
or
http://localhost:8080/rest/hr/employee


Deploying the application to Google App Engine

Before deploying the application you need to register a new application in Google App Engine using the Administartion Console, see the documentation here. In my example I have used "tugdual" as Application ID.
You can easily now deploy the application to Google App Engine by clicking on the  "Deploy App Engine Project" button Deploy App Engine Project Button available in the Eclipse toolbar.
To be able to deploy your application to Google App Engine, you need to check that your application can be registered, the application ID is stored in the WEB-INF/lib/appengine-web.xml.
<?xml version="1.0" encoding="utf-8"?>
<appengine-web-app xmlns="http://appengine.google.com/ns/1.0">
 <application>[your-application-id]</application>   
 <version>1</version>    
 <!-- Configure java.util.logging -->
  <system-properties>
   <property name="java.util.logging.config.file" value="WEB-INF/logging.properties"/>
 </system-properties>    
</appengine-web-app>

The App Engine deploy button prompts you for multiple informations: username (your Google account) and password.

When the deployment is complete you can access your application using the following URL:
http://[your-application-id].appspot.com/resources/hr/employee
or
http://[your-application-id].appspot.com/rest/hr/employee

Ading XML and JSON support to the service

Let's now add new method to manipulate an "Employee" object using the service, and the data format should be based on JSON and XML. This is where JAXB is useful, since it allows easily to transform marshall/unmarshall Java objects in XML -obviously- and JSON (cool isn't!)

Creating an Employee Class

Start with the creation of a new class to manipulate Employee data, this is a very simple Java class that could look like the following code:

package com.grallandco.employee.service.model;
import java.util.Date;

public class Employee {
    private String firstName;
    private String lastName;
    private Date hireDate;
    private String email;   
    public Employee(String firstName, String lastName, Date hireDate, String email) {
        this.firstName = firstName;
        this.lastName = lastName;
        this.hireDate = hireDate;
        this.email = email;
    }
    public Employee() {}
    public String getFirstName() {
 return firstName;
 }
    public void setFirstName(String firstName) {
 this.firstName = firstName;
 }
    public String getLastName() {
 return lastName;
 }
    public void setLastName(String lastName) {
     this.lastName = lastName;
 }
    public Date getHireDate() {
 return hireDate;
 }
    public void setHireDate(Date hireDate) {
 this.hireDate = hireDate;
 }
    public String getEmail() {
        return email;
 }
    public void setEmail(String email) {
        this.email = email;
   }
    public String toString() {
        StringBuffer sb = new StringBuffer();
        sb.append("First: ").append(getFirstName());
        sb.append(" - Last: ").append(getLastName());
        sb.append(" - Date: ").append(getHireDate());
        sb.append(" - Email: ").append(getEmail());
        return sb.toString();
    }
}
When implementing your "real" application with some persistence layer this POJO is the one as JDO/JPA entity.

Create a Converter class for your entity

I usually encapsulate all the transformation in some converter class, like that I do not directly couple my business class to the serialisation mechanism. (So I do that for classes and lists of classes). So instead of adding the JAXB annotations to the Employee class itself, let's create an EmployeeConverter class that will be responsible of the transformation and used by your REST service.

package com.grallandco.employee.service.converter;

import java.util.Date;
import javax.xml.bind.annotation.XmlElement;
import javax.xml.bind.annotation.XmlRootElement;
import com.grallandco.employee.service.model.Employee;

@XmlRootElement(name = "employee")
public class EmployeeConverter {
 private Employee entity = null;
 public EmployeeConverter() {
 entity = new Employee();
 }

 public EmployeeConverter(Employee entity) {
 this.entity = entity;
 }

 @XmlElement
 public String getFirstName() {
 return entity.getFirstName();
 }

 @XmlElement
 public String getLastName() {
 return entity.getLastName();
 }

 @XmlElement
 public Date getHireDate() {
 return entity.getHireDate();
 }

 @XmlElement
 public String getEmail() {
 return entity.getEmail();
 }

 public Employee getEmployee() {
 return entity;
 }

 public void setFirstName(String firstName) {
 entity.setFirstName(firstName);
 }

 public void setHireDate(Date hireDate) {
 entity.setHireDate(hireDate);
 }

 public void setLastName(String email) {
 entity.setEmail(email);
 }

 public void setEmail(String lastName) {
 entity.setLastName(lastName);
 }
}
You can now update your service to use this utility/converter class to return XML or JSON ojbect based on the content type of the request.

Add support to JSON and XML to your REST service

You need to change the EmployeeRessource class, to change the signature and add new annotations of the getEmployee() method.
The annotation you are adding:
  • @Produces({"application/xml", "application/json"}) : indicates which type of content will be produced by the service. Based on the type of the request.
  • @Path("/employee/{employeeEmail}/") :    change the Path to indicate a Path parameter, here for example the URL can accept an email in the URI - not the best example, but you get the point...
  • public EmployeeConverter getEmployee( @PathParam ("employeeEmail") String email)  : change the type returned by the method and take a parameter as String that match the Path param defined in the @Path annotation
Here the complete class code:
package com.grallandco.employee.service.rest.impl;

import javax.ws.rs.Path;
import javax.ws.rs.GET;
import javax.ws.rs.PathParam;
import javax.ws.rs.Produces;
import com.grallandco.employee.service.converter.EmployeeConverter;
import com.grallandco.employee.service.model.Employee;

@Path("/hr/")
public class EmployeeRessource {

 
 @GET
 @Produces({"application/xml", "application/json"})
 @Path("/employee/{employeeEmail}/") 
 public EmployeeConverter getEmployee( @PathParam ("employeeEmail") String email) {
 //dummy code
 Employee emp = new Employee();
 emp.setEmail(email);
 emp.setFirstName("John");
 emp.setLastName("Doe");
 EmployeeConverter converter = new EmployeeConverter(emp);
 return converter;
 } 
}


Test the service

You can now run the server locally and test the service
http://localhost:8080/resources/hr/employee/tug@grallandco.com
This will return an XML document.
If you want to test the JSON call you have multiple choice:
  • Using following command
tgrall$ curl -H "Accept: application/json" http://localhost:8080/resources/hr/employee/tug@grallandco.com
{"email":"tug@grallandco.com","firstName":"John","lastName":"Doe"}
  • Using an HTTP client that allows your to configure/set the HTTP request completely, I am using the Poster Firefox Plugin
  • Using some Javascript code in an application
You can repeat the test on your deployed application on Google App Engine.

Conclusion

In this article you have learned how to create and deploy a new REST Service on Google App Engine. This service has been created with the JAX-RS Reference Implementation the Jersey project. In the next article you will learn how to add persistence and create a CRUD Rest service on Google App Engine.